Camera settings sidebar
The Camera settings sidebar contains the basic camera settings for the Qualisys cameras. It is displayed at the right side of the 2D view window when the camera system is live. Use these settings when setting up the camera system to get the best data. The settings are also available on the Cameras page in the Project options dialog, refer to chapter Cameras for more details about the settings.
The sidebar is pinned by default, so that it is always visible. When unpinned, it slides out when you move the mouse on the edge to the right in the 2D view window.
The sidebar will only display settings that are available for the currently visible (selected) cameras. For example, when all cameras are in marker mode the Video settings are hidden. All of the settings, except the Marker Capture Rate, apply only to the currently visible cameras in the 2D view window. Therefore, it is important to use the buttons at the bottom of the 2D view window to select the cameras for which you want to change a setting.
If the currently visible cameras have different settings it will say Differs. When changing such value it will set all the currently visible cameras to the same setting.
The Marker and Video settings apply to all marker cameras models, as well as Oqus high-speed video cameras. The settings of the streaming video cameras (Miqus Video and Oqus 2c) are available under Streaming Video.
The following settings are available on the sidebar.
Camera Mode

These settings change the mode of the camera and you can also activate some other options.
-
Marker, Intensity, Video
Switch between the different camera modes. For a description of the different camera modes see chapter Video preview in QTM.
The mode can also be changed individually on a camera from the 2D view window menu. -
3D Overlay
Toggle the 3D overlay on and off.
The 3D overlay can also be turned on individually for a camera from the 2D view window menu. -
Active Filtering (not available for Oqus 3 and 5 series)
Enable the Continuous setting for the Active filtering mode, the cameras will capture two images to remove the background light. For information on how to use active filtering see chapter Active filtering for capturing outdoors.
Active filtering is not available for Oqus 3 and 5 series cameras. If you have a system that partly consists of these camera types, you can still turn on active filtering for the others.
-
Advanced...
Clicking the Advanced… link will open the Cameras page in the Project Options. The currently selected cameras will be selected in the camera list.
Marker settings
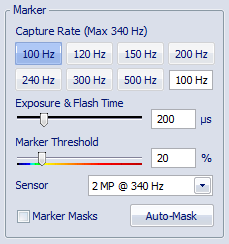
These settings change marker settings for the visible cameras.
-
Capture Rate
The capture rate that is used by cameras measuring markers. The capture rate applies to all cameras.
The maximum capture rate shown above the capture rate buttons applies to the cameras at full image size. If the camera system includes different camera types, the maximum capture rate is determined by the camera with the lowest maximum.
Buttons with a value exceeding the maximum capture rate are indicated in red. When selecting a frequency beyond the maximum capture rate, the image size of the cameras of which the maximum is exceeded is automatically reduced.
When the image size is automatically reduced, the aspect ratio is preserved. However, for most camera types, the capture rate is only dependent on the vertical dimension. You can increase the width of the image manually by dragging the sides of the red rectangle.
-
Exposure and Flash Time
The time used by the camera to capture the image in marker mode, for advice on this setting see chapter Tips on marker settings in QTM. The current maximum Exposure and Flash Time is displayed with a dark blue bar.
If the camera system includes different camera types, then the maximum Exposure and Flash Time can differ depending on which cameras are displayed in the 2D view.
-
Marker Threshold
The intensity level in the image used to detect markers, where the default value is 17. For example a lower value means that areas of less bright pixels will become markers, for advice on this setting see chapter Tips on marker settings in QTM.
Below the slider is the color scale which used for color-coding the video image in Marker intensity mode. The image will be green at the marker threshold and then blue below and yellow to red above threshold. -
Marker Masks
Toggle the marker masks. If deselected the marker masks in the current cameras will not be used by the camera. The masks will be grey and the markers below them will appear.
-
Auto-Mask
Create masks over all of the visible markers in the current cameras. It is important to make sure that it is only unwanted reflections that are visible when pressing the button. For more information about marker masking see chapter How to use auto marker masking.
The number of masks per camera is limited to 20 for Arqus and Miqus cameras and 5 for Oqus cameras. If there are more unwanted reflections you can manually edit the masks.
-
-
Sensor Mode
Switch Sensor mode for the current cameras in marker mode. You can select between a full size mode and high speed sensor modes. Use the high speed modes for example if you need to capture at higher frequencies and still want the full FOV, but you do not need the full resolution. For an overview of available sensor modes per camera type, refer to the table in Qualisys camera sensor specifications (marker mode).
Streaming Video settings
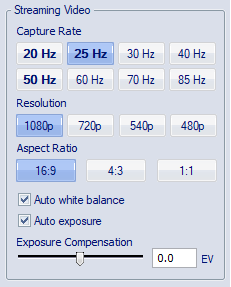
These settings change streaming video settings for the visible streaming video cameras (Miqus Video or Oqus 2c).
-
Capture Rate
The capture rate that is used by cameras capturing video. The video capture rate can be set by pressing one of the available buttons. The buttons show commonly used values for video capture rate. Integer divisions or multiples of the current marker capture rate are indicated bold. The number of buttons and their exact values depend on the current maximum video capture rate. The maximum capture rate for the current settings (resolution and aspect ratio) is displayed above the buttons.
The video capture rate can differ between cameras. When changing the video capture rate, the change is applied to the currently selected cameras in the 2D View window.
-
Resolution
Set the resolution of the video image by pressing one of the four buttons. The available values are 1080p, 720p, 540p and 480p (the values indicate the vertical dimension of the image in pixels).
-
Aspect ratio
Set the aspect ratio of the video image by pressing one of the three buttons. The available aspect ratios are 16:9, 4:3 and 1:1.
-
Auto Exposure
Check to use automatic exposure for streaming video cameras. When activated the Exposure Time and Gain options are hidden and controlled by the auto exposure. Optionally, use the Auto Exposure Tool to limit the image area used to set the exposure (see chapter 2D view toolbar).
-
Auto white balance
Check to use automatic white balance. This option is only available for the Miqus Video Color camera. Optionally, use the Auto Exposure Tool to limit the image area used to set the white balance (see chapter 2D view toolbar).
-
Exposure Compensation (auto exposure only)
The Exposure Compensation option can be used to adjust the exposure of the image when using Auto Exposure. Increase the value (positive EV) for a brighter image or decrease the value (negative EV) for a darker image.
-
Exposure Time (manual exposure only)
The exposure time used by the selected streaming video cameras. The current maximum Exposure time is displayed with a dark blue bar.
-
Gain (manual exposure only)
The Gain option can be used to change the sensitivity of the sensor. Increase the gain for a brighter image. The available values are 1, 2, 4 (default), 8 and 16. Note that the image quality may decrease at high gain values.
Video settings

These settings change video settings for the visible cameras when in video mode (uncompressed video).
-
Capture Rate
The capture rate that is used by cameras capturing video. The maximum capture rate at full image size is displayed above the slider. If the camera system includes different camera types, the maximum capture rate is determined by the camera with the lowest maximum, also indicated by the dark blue bar in the slider.
-
When setting a frequency beyond the maximum capture rate, the image size of the cameras of which the maximum is exceeded is automatically reduced. If the image size has been set manually for a camera the reduced image size will have the same relations for x and y.
The video capture rate can differ between cameras. When changing the video capture rate, the change is applied to the currently selected cameras in the 2D View window.
-
Exposure time
The time used by the cameras in video mode. Set it to a value where the image is bright enough, for more information see chapter Outline of how to capture high-speed video. The current maximum Exposure time is displayed with a dark blue bar.
If the camera system includes different camera types, the maximum Exposure time can differ depending on which cameras are selected in the 2D view.
-
Flash time
The time of the IR flash in video mode. This setting can be set to Off (0) microseconds unless you have markers placed on the subject that you want to be visible in the video. The current maximum Flash time is displayed with a dark blue bar.
-
Gain
Set the gain for the current cameras in video mode to get a brighter video image. Depending on the camera type you can use gain values of 1, 2 or 4 and for some cameras also 8 and 16.
-
Compression
The Compression setting can be used to switch between None, In-camera MJPEG and Software compression. The default for Oqus 2c, 5+, and 7+ is In-camera MJPEG, which is the recommended setting for those cameras. For the other cameras the default is None, however, most of the time it is recommended to select Software and a Codec to reduce the video file size.
-
Sensor Mode
Switch sensor mode for the current cameras in video mode. You can select between a full size mode and high speed sensor modes. Use the modes for example if you need to capture at higher frequencies and still want the full FOV, but you do not need the full resolution. For an overview of available sensor modes per camera type, refer to the tables in Qualisys video sensor specifications (in-camera MJPEG) and High-speed video.
Lens Control
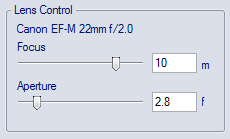
The lens control settings are only available for cameras with a motorized lens. The type of lens on the camera is shown above the settings.
-
Focus
Set the focus for the current cameras. The same setting is used for marker and video mode. The minimum distance is 1 m and furthest distance is 20 m.
-
Aperture
Set the aperture for the current cameras. The same setting is used for marker and video mode. The available aperture values are dependent on the lens in the camera.
Once focus and aperture have been set for the cameras, it is possible to disable lens control using the Qualisys Firmware Installer. This way the current lens settings will be fixed. For more information, see How to use Qualisys Firmware Installer (QFI).