2D view toolbar
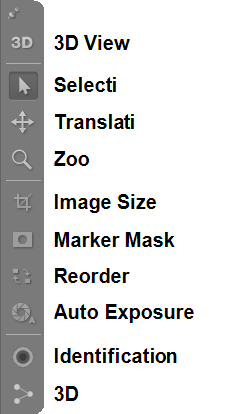
The 2D view toolbar contains settings for manipulating the 2D view of the different cameras and for switching between 2D and 3D view. From left to right the icons have the following use.
-
3D View Button
Switch to 3D view.
-
Selection
Use the normal mouse behavior.
-
Translation
Use the left mouse button to translate the 2D view.
-
Zoom
Use the left mouse button to zoom the 2D view.
You can also use the mouse wheel for zooming.
-
Image Size Tool
Use the left mouse button to draw a new image size for a camera. The new image size will be marked with a red frame and everything that is outside the frame is greyed out. To modify an existing image size frame use the normal cursor and drag the edges or move the whole frame. For more information about image size see chapter Image size.
When changing the capture rates from the Camera settings sidebar the image size is reduced automatically if the frequency is higher than max frequency at full image size. However when changing the capture rate from the Project options dialog the image size must be reduced first. For example if you have one camera in video mode you still have to reduce the image size in video mode for all of the cameras.
When showing a marker view or video image in a file, only the active part of the marker view or video image is displayed. I.e. if the Image size of the camera has been reduced, then the aspect ratio of that view will match the reduced image size.
-
Marker Mask Tool
Use the left mouse button to draw a new marker mask for a camera. Marker masks can either be added while in preview mode (Marker or Marker intensity) and is then added to the list of camera masks, or when added to a camera in a file then the masks are only used in reprocessing of that file.
A new camera marker mask will be added as a green area and the markers inside the mask will be removed immediately, see chapter Marker masking.
A new software marker mask is added as a blue area and the 2D data is not affected until the file is reprocessed, see chapter How to use software marker masks.
-
Reorder Tool
Use the left mouse button and drag and drop the whole camera view to change the camera order in QTM. Use this cursor to change the number on the camera display so that they come in the order that you want.
-
Auto Exposure Tool (only available for Miqus Video and Oqus 2c cameras)
Draw the Auto exposure area with this tool. The area is displayed as a gray rectangle when the tool is active. By default the area is maximized to the current image size, but if for example there is a very bright part of the image the auto exposure will work better if the area is reduced. For Miqus Video Color the auto exposure area is also used to set the white balance.
-
Identification Tool
Click to switch on the green LED ring on the selected Arqus or Miqus cameras.
-
3D Overlay
Click to turn on/off 3D overlay for the selected cameras.