Tips on marker settings in QTM
The two important settings for marker calculation are Exposure time and Marker threshold. The steps and suggestions below provide a basic method for adjusting the settings. Please note that it is not possible to give more specific advice on how to adjust the settings, because of their dependence on the context and their interrelation. There are also other settings that can help to get a better measurement, e.g. Marker masking or Marker limits.
First of all make sure that the focus and aperture are correct, see Tips on setting aperture and focus.
Exposure and threshold must be used together, because changing one can lead to that you have to change the other. Follow these steps to set exposure and threshold settings.
-
Start a new measurement and stay in preview mode. Use the Camera settings sidebar to change the settings.

-
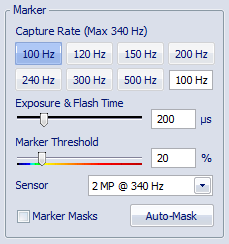
Set the Exposure time at 200-300 microseconds and Marker Threshold to 20. These are the default values and often it is a good starting point.
-
Start by looking at the marker intensity image. Click on the Marker intensity button in the Camera settings sidebar to show the marker intensity image. For more information see chapter Video preview in QTM.
-
If the markers are not bright red in the marker intensity image, try increasing the Exposure time until they are bright red. For example, with a longer distance to the markers, you may need a longer exposure time.
-
For higher frequencies it might not be possible to increase the exposure so that the markers are bright red. However, as long as they are brighter than the background the camera should be able to find them by lowering the marker threshold.
-
If there are extra reflections, you can try reducing the Exposure time. Extra reflections are anything that is not a marker and has a color different from blue. Green is the threshold level.
-
Remember that you can set this setting individually for each camera, see chapter Camera settings sidebar.
-
-
Switch back to Marker mode and check if the markers are visible. If they are not, go back to Marker intensity mode and adjust the Marker threshold value. It is not possible to give an exact value for the threshold at a certain exposure, because each setup is different.
-
Increase the threshold if the background looks light blue or even green in the marker intensity image. A light blue background will make it harder for the camera to calculate the markers.
-
Decrease the threshold if the markers are not bright red in the marker intensity image. For example, at short exposure times of 100 µs and lower the threshold needs to be low, usually around 10-15.
-
Make sure that the marker calculation is stable at the selected threshold. If the threshold gets too low there will be a lot of extra reflections or no markers at all. A too high threshold will result in small markers or missing markers.
-
Remember that you can set this setting individually for each camera, see chapter Camera settings sidebar.
-
-
Finally check that the markers are large enough to give a good accuracy. Check that the marker size is at least 200 in the Data info window.