3D View window menu
The View window menu is opened by right-clicking in a 3D View window. It can also be opened on the View menu. Note that if you right-click on bones or markers in the 3D view then the Bone menu respectively Trajectory info window menu is opened instead.
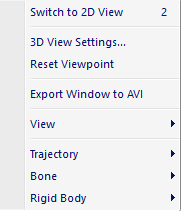
In a 3D View window the following actions can be performed:
-
Switch to 2D View
Switch the View window to 2D view.
-
3D View Settings...
Open the 3D view settings page in the Project options dialog so that you can change the display options for the objects in the 3D view, see chapter 3D view settings.
-
Reset Viewpoint
Reset the camera viewpoint to center of mass of the tracked markers (same as double clicking in the 3D view window).
-
Export Window to AVI
Export the current 3D view window to an AVI file, see chapter Export to AVI file.
-
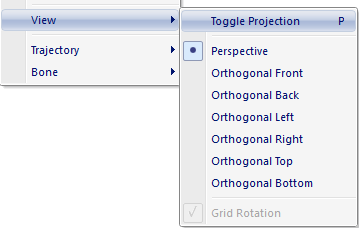
View
Toggle projection between Perspective and Orthogonal (keyboard shortcut P), and choose viewpoint of orthogonal projection (orthogonal front, back, etc.). When toggling the projection from Perspective to Orthogonal, the viewpoint snaps to the closest orthogonal projection. The Grid Rotation option rotates the grid in accordance with the selected orthogonal view when checked (only available in orthogonal projection mode).
-
Trajectory
Open the Trajectory info window menu for the selected markers, see chapter Trajectory info window menu.
-
Bone
Create and delete bones and change the bone color. For more information see chapters Bone menu and Bones in 3D views.

-
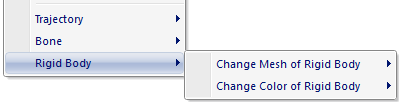
Rigid Body
Change mesh settings or change color of selected rigid body. The changes apply to the rigid body definition in the file, not the one in the project.