Bones in 3D views
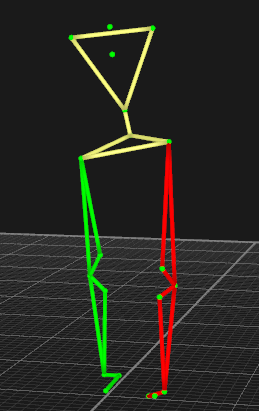
Bones are used to visualize the connection between two markers in 3D views, e.g. if the measurement is done on a leg, bones can connect hip to knee, knee to foot and so on. The bones can have different colors and the bone colors that are used are saved with the AIM model.
Create bones
To create bones you need to select at least two labeled trajectories, e.g. by holding Shift and clicking in the 3D view window. Then press B or click Create bone in the Bone menu to create bones between the selected trajectories. Several bones can be created in succession by using the Create bones sequence tool in the 3D view toolbar. The bones will then be created between the trajectories in the order that you click on them.
If bones are included in the capture file that is used to generate an AIM model, the bones and their colors will be created again when the AIM model is applied. The bones are also saved in label lists, so that they are loaded if a label list is loaded.
Modify bones
Right clicking on a bone opens the Bone menu. The bone menu can be used to change the bone color or delete bones. The action can be applied to several bones at once. Multiple bones can be selected as follows:
-
Hold Ctrl and click on successive bones to add them to the selection.
-
Select one bone, and then press Shift and drag the mouse over the area in which you want to select the bones.
-
To deselect a bone, hold Ctrl and press on the selected bone.
To delete one or more bones, select the bones. Then press delete or right-click on the bone and click Delete bone. To delete all bones use Delete all bones on the Bone menu.
The bones visualization settings are set on the 3D view settings page in the Project options dialog.
You can use the Bones button on the GUI Control toolbar or Alt + 2 to show or hide the bones.