Calibration results
The Calibration results dialog is shown after a calibration is completed. It displays if the calibration passed and the calibration quality results. The error messages of a failed calibration are described in the chapter Calibration failed.
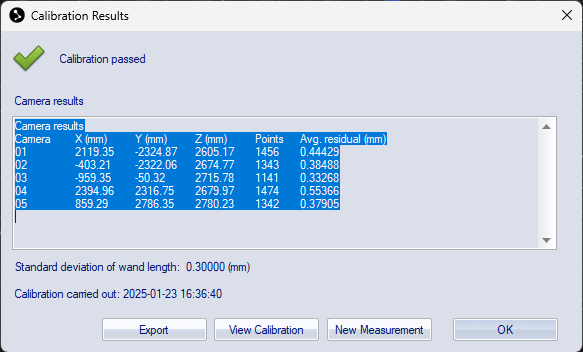
At the top you get a message if the calibration passed or not. There is also a warning if the cameras are using Exposure delay.
There are four buttons at the bottom of the dialog, clicking them have the following effects.
-
OK
Close the dialog and the calibration file. -
New measurement
Close the dialog and the calibration file and open a new capture file in preview mode. -
View Calibration
Track the calibration file and close the dialog. -
Export
Export the calibration results to a xml file. The exported file also includes the rotation matrix for the cameras. The default folder to save in is the Calibrations folder in the project folder, see chapter Project folder.
The current calibration can be viewed on the Current calibration page in the Project options dialog. The page can be opened by double-clicking the calibration status icon in the bottom right corner of the Status bar.
In a capture file the calibration
results can be examined by clicking the Reprocessing icon  and
then opening the Calibration page.
and
then opening the Calibration page.
Quality results
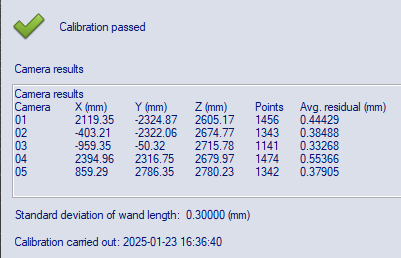
The quality results under the Camera results heading are camera specific. For each camera ID there are the following five results:
-
X (mm), Y (mm) and Z (mm)
The distance (in mm) between the origin of the coordinate system of the motion capture to the optical center of the camera. The distances are respectively in the X, Y and Z direction.For wand calibrations the default origin of the coordinate system is in the center of the corner marker, for information on how to translate the origin see chapter Translating origin to the floor.
-
Points
Number of points used in the calculation of the distance above. The number should be as many as possible, but without large differences between the cameras. The maximum number of points for a Wand calibration depends on the calibration time and the number of frames used in the calibration. If the camera has more than 500 points it is usually enough for a normal measurement volume. For the other methods it depends on the number of markers seen by the camera. -
Avg. res. (mm)
The average residual (in mm) for the points above. The residual of the cameras should be similar in size and as low as possible. Depending on the measurement volume the average residual can differ between 0.5 to 1.5.
If the camera result says Unused camera, then the camera has been deactivated on the Linearization page in the Project options dialog. That camera cannot be used in measurements, unless the calibration is reprocessed, see chapter Recalibration.
For a Wand calibration there are also a general quality results:
-
Standard deviation of wand length
The standard deviation (in mm) of the wand length in the calibration.
Finally the calibration time when the calibration was performed is displayed at the end.
View Calibration
With View Calibration the calibration is tracked and opened in a 3D view window. For a Wand calibration the movements of the wand is shown and the measurement volume can be confirmed. For the other two methods the positions of the markers can be confirmed in the 3D view.
If the calibration is opened, the window must be closed before a new capture can be started.
Calibration failed
If the calibration fails the calibration result will say Calibration failed and an error message is displayed after each camera ID.
The error messages are as follows:
-
General calibration failure
Something is wrong in the calibration. Check the calibration settings.
Wand calibration errors:
-
Couldn't find the fourth marker of the L-frame
The marker on the short leg of the L could not be found. Check the reference structure and that all four markers are visible in the preview window of the camera. -
Couldn't find the three markers in line on the L-frame
The three markers in line on the long leg of the L could not be found. Check the reference structure and that all four markers are visible in the preview window of the camera. -
One or more of the markers on the L-frame were unstable
The reference structure or the camera has moved during the calibration. Make a new calibration. -
Could not initialise camera
There is some general failure so that the camera cannot calculate where the L-frame is. One possible reason is that it is the wrong linearization file.
Frame and Fixed camera calibration errors:
-
Less than 75% of the frames had the correct no of markers in stable positions
Some of the markers have been hidden or moved during the calibration. Make a new calibration. -
Wrong number of markers seen by the camera in the first frame
The definition of markers seen by each camera does not match the markers in the first frame. Check that the calibration settings on the Calibration page in the Project options dialog are correct. -
No markers defined to be seen by this camera
There are no markers specified in the calibration settings for this camera. Check which markers that are seen and enter them on the Calibration page in the Project options dialog.