Recalibration
An existing calibration can be recalibrated to improve it or solve problems with it. Recalibration can be particularly useful when it is not possible to perform a new calibration, for example when a problem with the calibration is discovered during post-processing of data. A recalibration can be done for the following reasons:
-
Correct wrong calibration settings, for example if the wrong calibration kit was selected, or if the wand length was incorrect,
-
Change the axis directions or apply a transformation,
-
Include or exclude cameras from a calibration,
-
Use a different calibration method, for example, turn a standard calibration into an advanced calibration, or vice versa, see chapter Converting between standard and advanced calibration,
-
Apply 2D preprocessing to the calibration file to improve the quality of 2D data used for the calibration, for example using software masks to remove extra reflections, see chapter Processing 2D data.
A combination of the above points can in some cases be used to fix failed calibrations in a difficult environment.
Performing and applying a recalibration
To perform a recalibration and apply it to one or more capture files, follow these steps:
-
Open the calibration file. The calibration files are located in the Calibrations folder in the project, and have extension .qca.
To open a calibration used for a specific measurement file, you can locate and open it via the File reprocessing dialog:
-
Open the measurement (.qtm) file.
-
Press the Reprocess button
 to open the File reprocessing dialog.
 -
Make sure to check the Track the measurement (3D) processing step using calibration settings from the measurement.

-
Open the Calibration page. You will find the calibration used for the measurement under Calibration file.

-
Press Open, and then Yes in the Open calibration file dialog to open the calibration file.
Notes about locating calibration files:
-
If the calibration file is not found, it may be located in another projects Calibrations folder since QTM always uses the latest calibration for a camera system, independent of the project in which it was performed.
-
Calibration files with the suffix _transformed do not contain 2D data and cannot be used for recalibration. In that case, locate the original calibration containing the 2D data and make sure to apply the transformation again if needed.
-
-
-
If needed, reprocess the calibration file to apply any 2D preprocessing operations before performing the recalibration.
-
Press the Calibrate button
 to open the Recalibration dialog.
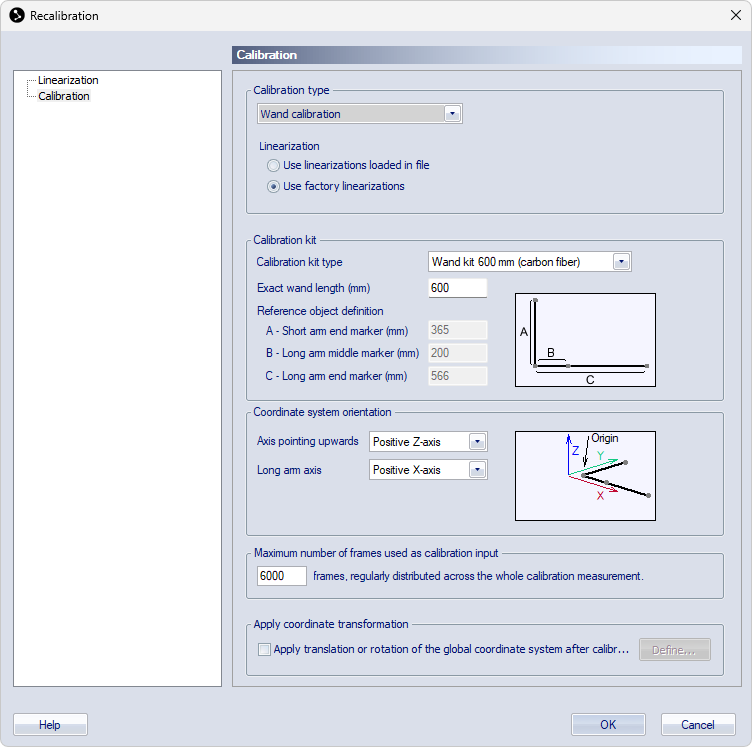
Alternatively, open the Advanced recalibration dialog via the Capture menu. For more information about the advanced calibration method and the choice of linearization files used for the calibration, see chapter Advanced calibration.
-
The recalibration dialog gives access to the following options:
-
The Calibration options
On the Calibration page you can view or modify the calibration options.
-
Linearization options
Click on Linearization in the left pane to open the Linearization page. Here you can:
-
View or change linearizations per camera.
-
Select or deselect cameras to include or exclude them for the recalibration.
-
For more information about calibration and linearization options, see chapters Calibration and Linearization.
-
-
Click OK to start the recalibration.
-
Once the recalibration is finished, the Calibration results dialog is shown.
Click Use if you want to use the reprocessed calibration as the current calibration for the project. Clicking OK will only close the Calibration results dialog.
It is possible to Use a calibration, even if it does not match the current camera system in the project, to facilitate reprocessing measurements with the modified calibration.
-
Save the calibration file and close it.
When saving the calibration file, you can rename it or add a suffix to the file name so that it can be easily recognized.
-
Apply the modified calibration to one or more associated measurements by reprocessing or batch reprocessing them.
-
Make sure to check the Track the measurement (3D) processing step, and that the modified calibration is used for the reprocessing.
For more information about reprocessing and batch reprocessing of measurements, see chapter Reprocessing data.
-
Converting between standard and advanced calibration
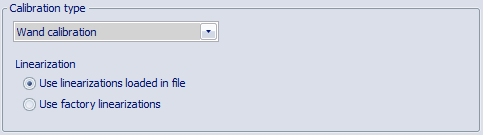
It is possible to convert standard calibrations to advanced ones and vice versa. Advanced calibration files contain both sets of optimized and factory linearizations. In the Recalibration dialog, the option to choose the linearizations used for the recalibration is available under Calibration type.
For converting between calibration methods, follow the steps below.
-
Standard to advanced calibration
-
Open the original standard calibration file.
-
Go to the Capture menu and click Advanced calibration... to open the Advanced calibration dialog.
In this case, the Linearizations choice is not available since the file only contains factory linearizations.
-
Press OK to perform the recalibration.
Advanced to standard calibration
-
Open the original advanced calibration file.
-
Press the Calibrate button
to open the Recalibration dialog. -
Under Linearizations, check the Use factory linearization option.
-
Press OK to perform the recalibration.
-