How to use events
Adding events
Events can be used to mark something that is happening. The events is sent in RT and can be added to a QTM file during the measurement and after the measurement.
Events can be created using an external trigger or manually in QTM.
Trigger event
You can use an external trigger to generate an events during a measurement. When using the Qualisys trigger button, it is recommended that you release the button quite quick, because releasing the trigger button can sometime also generate an event. If you have trouble with extra events, you can increase the hold-off time on the Synchronization page.
The event functionality is activated by default but can be changed with the Generate event setting for the external trigger on the Synchronization page, see chapter Trigger ports.
Events cannot be created if you have selected to stop on the external trigger.
When the events are created during a capture it will be stored in the QTM file as Trigger or Trigger start event. The Trigger start event is only used for start event of a pretrigger measurement. You can change the default color of these events on the Synchronization page in Project options, see chapter Synchronization.
The timing of the Trigger event will be the exact time when the signal is received by the camera. It is therefore the most exact way to set an event, especially if the trigger signal is generated automatically. Because the time of the event can be any time between two frames, it means that it is most likely not placed exactly at the capture of a frame. The frame number of the event will be rounded to the nearest frame.
Manual event
A manual event can be created with the Add event
button ![]() or by using the keyboard shortcut Ctrl+E. The events can be created with the button both during RT/capture and after
a measurement. In file mode, events can even be added via the Events submenu by right-clicking in the Timeline control bar.
or by using the keyboard shortcut Ctrl+E. The events can be created with the button both during RT/capture and after
a measurement. In file mode, events can even be added via the Events submenu by right-clicking in the Timeline control bar.
When the events are created during a capture it will be stored in the QTM file as Manual event. The timing of the Manual event will be the time when you press the button in QTM. This means that it is most likely not placed exactly at the capture of a frame. The frame number of the event will be rounded to the nearest frame.
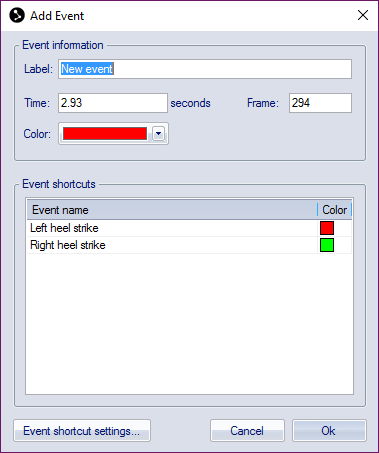
Events created with Add event button in a file will open the Add event dialog. The event will be placed on the current frame in the file. You can change the Label of the event and also Time, Frame and Color.
You can also use event shortcuts in the Add event dialog to create the events. Double-click on an event shortcut in the list to load the label name and color. To edit the shortcuts click on Edit event shortcuts, that opens the Events page in the Project options dialog, see chapter Events.
Viewing and editing events
The events are displayed above the timeline at the time
of the event as a red triangle  . In plots the event is displayed as a red
line at the time of the event. Place the mouse over the event on the timeline
to see information about the event. For information about all of the events
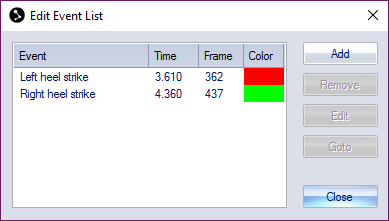
open the Edit event list dialog,
for example by right-clicking on an event and then on Edit
event list.
. In plots the event is displayed as a red
line at the time of the event. Place the mouse over the event on the timeline
to see information about the event. For information about all of the events
open the Edit event list dialog,
for example by right-clicking on an event and then on Edit
event list.
The Label, Time and Frame of events in a file can be edited in the following ways.
- Right-click on an event in the Timeline control bar and select Edit event. It will open the Edit event dialog where you can change the Label, Time and Frame.
- You can go to next and previous event in the file with Page Down respectively Page Up.
You can access all of the events in the Edit event list dialog. Which can be opened by right-clicking on an event and then on Edit event list.
-
Add
Add a new event with the Add event dialog.
-
Remove
Remove the selected event.
-
Edit
Open the Edit event dialog where you can change the Label, Time and Frame.
-
Goto
Go to the frame of the event in the file.
Exporting events
The events can be exported to other programs with the C3D, TSV and MAT export. In the C3D export the events are always included. The format of the C3D file follows the C3D standard.
For Visual3D 2020.8.3 or later it is required to use the option Following the C3D.org specification for the C3D export.
For the TSV export you need to activate the Include events option to export the events. For more information about the TSV format, see chapter Motion data (.tsv).
For the MAT export you need to activate the Events option to export the events. For more information about the MAT format, see chapter MAT file format.