How to set up Twin systems
Requirements
To use Twin systems, you need the following equipment:
-
Two Qualisys systems (Qualisys cameras of any type or mixed). It is highly recommended to use the same version of QTM for both systems since compatibility between different versions cannot be guaranteed.
-
Each system needs its own Camera Sync Unit.
-
If you have two Oqus systems without Camera Sync Unit, you can use two Oqus sync/trig splitter cables connected to a camera in the respective systems.
For Oqus systems at least one camera must be from the 3+-, 4-, 5+-, 6+ or 7+-series if you want to use frame synchronization.
-
-
A trigger button with BNC T-splitter and BNC cable.
-
Two computers with two Ethernet ports each.
-
If you want to use PTP synchronization to synchronize the systems (recommended) you will also need two Ethernet switches to connect the camera systems.
Make sure that you use a switch type that is approved by Qualisys. Contact Qualisys at support@qualisys.com for more information.
-
How to connect and set up Twin systems
Twin systems can be set up in different ways, depending on the used synchronization method. For detailed instructions on how to set up the system for the alternative synchronization methods, see chapter Synchronization setups.
For making the choice which of the systems should be the main system, take the following in consideration:
-
If you are using different capture frequencies for the main and the secondary system, the system with the highest frequency must be the main system.
-
Any video devices (Qualisys video cameras or external video devices) should be connected to the main system, otherwise the video feeds are not included in the merged file.
-
Any external input devices should be connected to the main system, otherwise the data is not included in the merged file.
Connection between the computers
For using Twin systems, both computers must be connected to each other through a local network in order to be able to communicate with each other. The easiest way is to connect both computers to your existing local area network using their free Ethernet ports (NOT the ones in use by the camera systems).
You can also connect the computers through a Wifi network, but a wired connection is recommended for a better stability.
If you do not want to have the computers connected to the network, you can create a direct network connection between the two computer as follows.
-
Connect the free Ethernet ports of the computers to each with an Ethernet cable.
-
Configure the Ethernet adapters on the respective computers so that they have different addresses on the same subnet, for example:
-
Main computer: 192.168.11.1
-
Secondary computer: 192.168.11.2
Follow these instructions to configure the network on the respective computers:
-
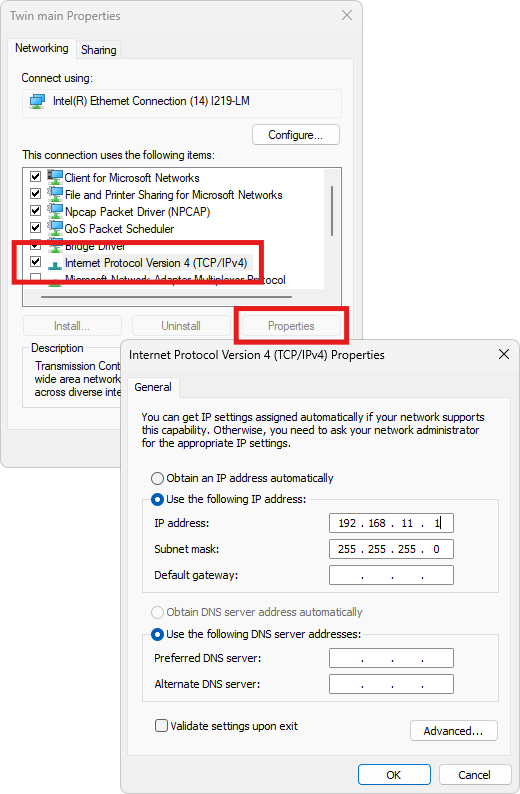
Open the Ethernet Adapter Properties on the main computer in Windows.
-
Select the option Internet Protocol Version 4 (TCP/IPv4) and click the Properties button.
-
In the Properties window, check the option Use the following IP address, and type the IP address of your choice in the IP address field.
-
Twin System settings in QTM
Once the computers are connected, follow these steps to configure the Twin systems. The Twin System settings are controlled from the main computer and automatically transferred to the secondary system.
-
Open QTM on both the main and the secondary computer, each with their own project to be used for the measurements.
-
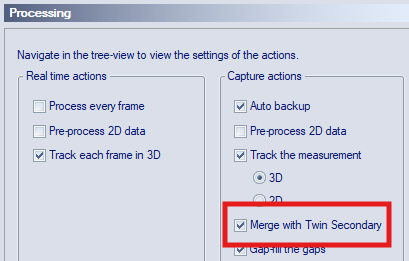
On the main computer, open the Processing page under Project Options and check the Merge with Twin Secondary option.
-
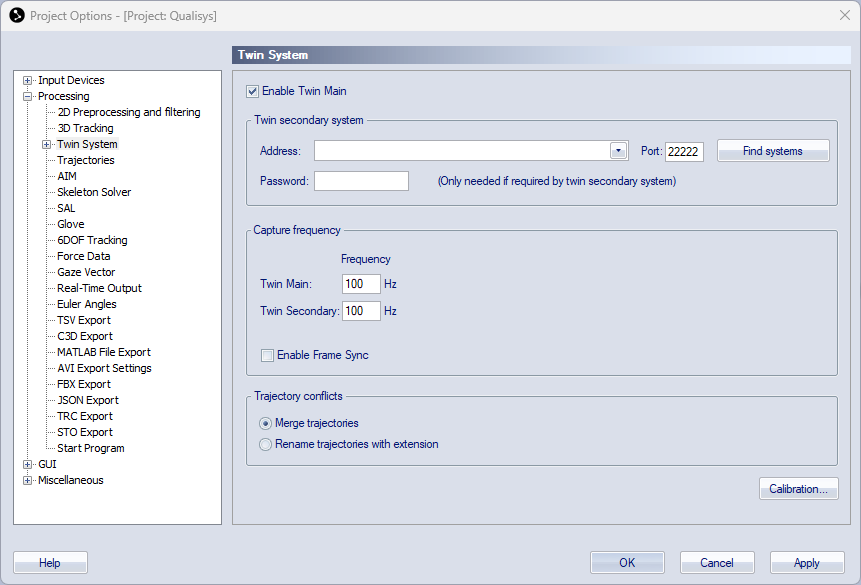
On the main computer, open the Twin System page under Project Options > Processing and check the Enable Twin Main option on top of the page.
-
Under the Twin secondary system header, press the Find systems button.

-
Select the secondary computer from the Address drop-down list. Alternatively, specify the IP address manually.
-
If needed, specify the password for taking control of the secondary computer, as set on the Real-Time Output page on that computer.
-
-
Press OK to apply the settings and close the Project Options dialog.
The systems should now be connected. If you start a preview on the main system, preview should be automatically started on the secondary system too.
Before being able to capture merged data, you must set up the system using one of the following synchronization options.
Synchronization setups
How to set up Twin systems with PTP synchronization (recommended)
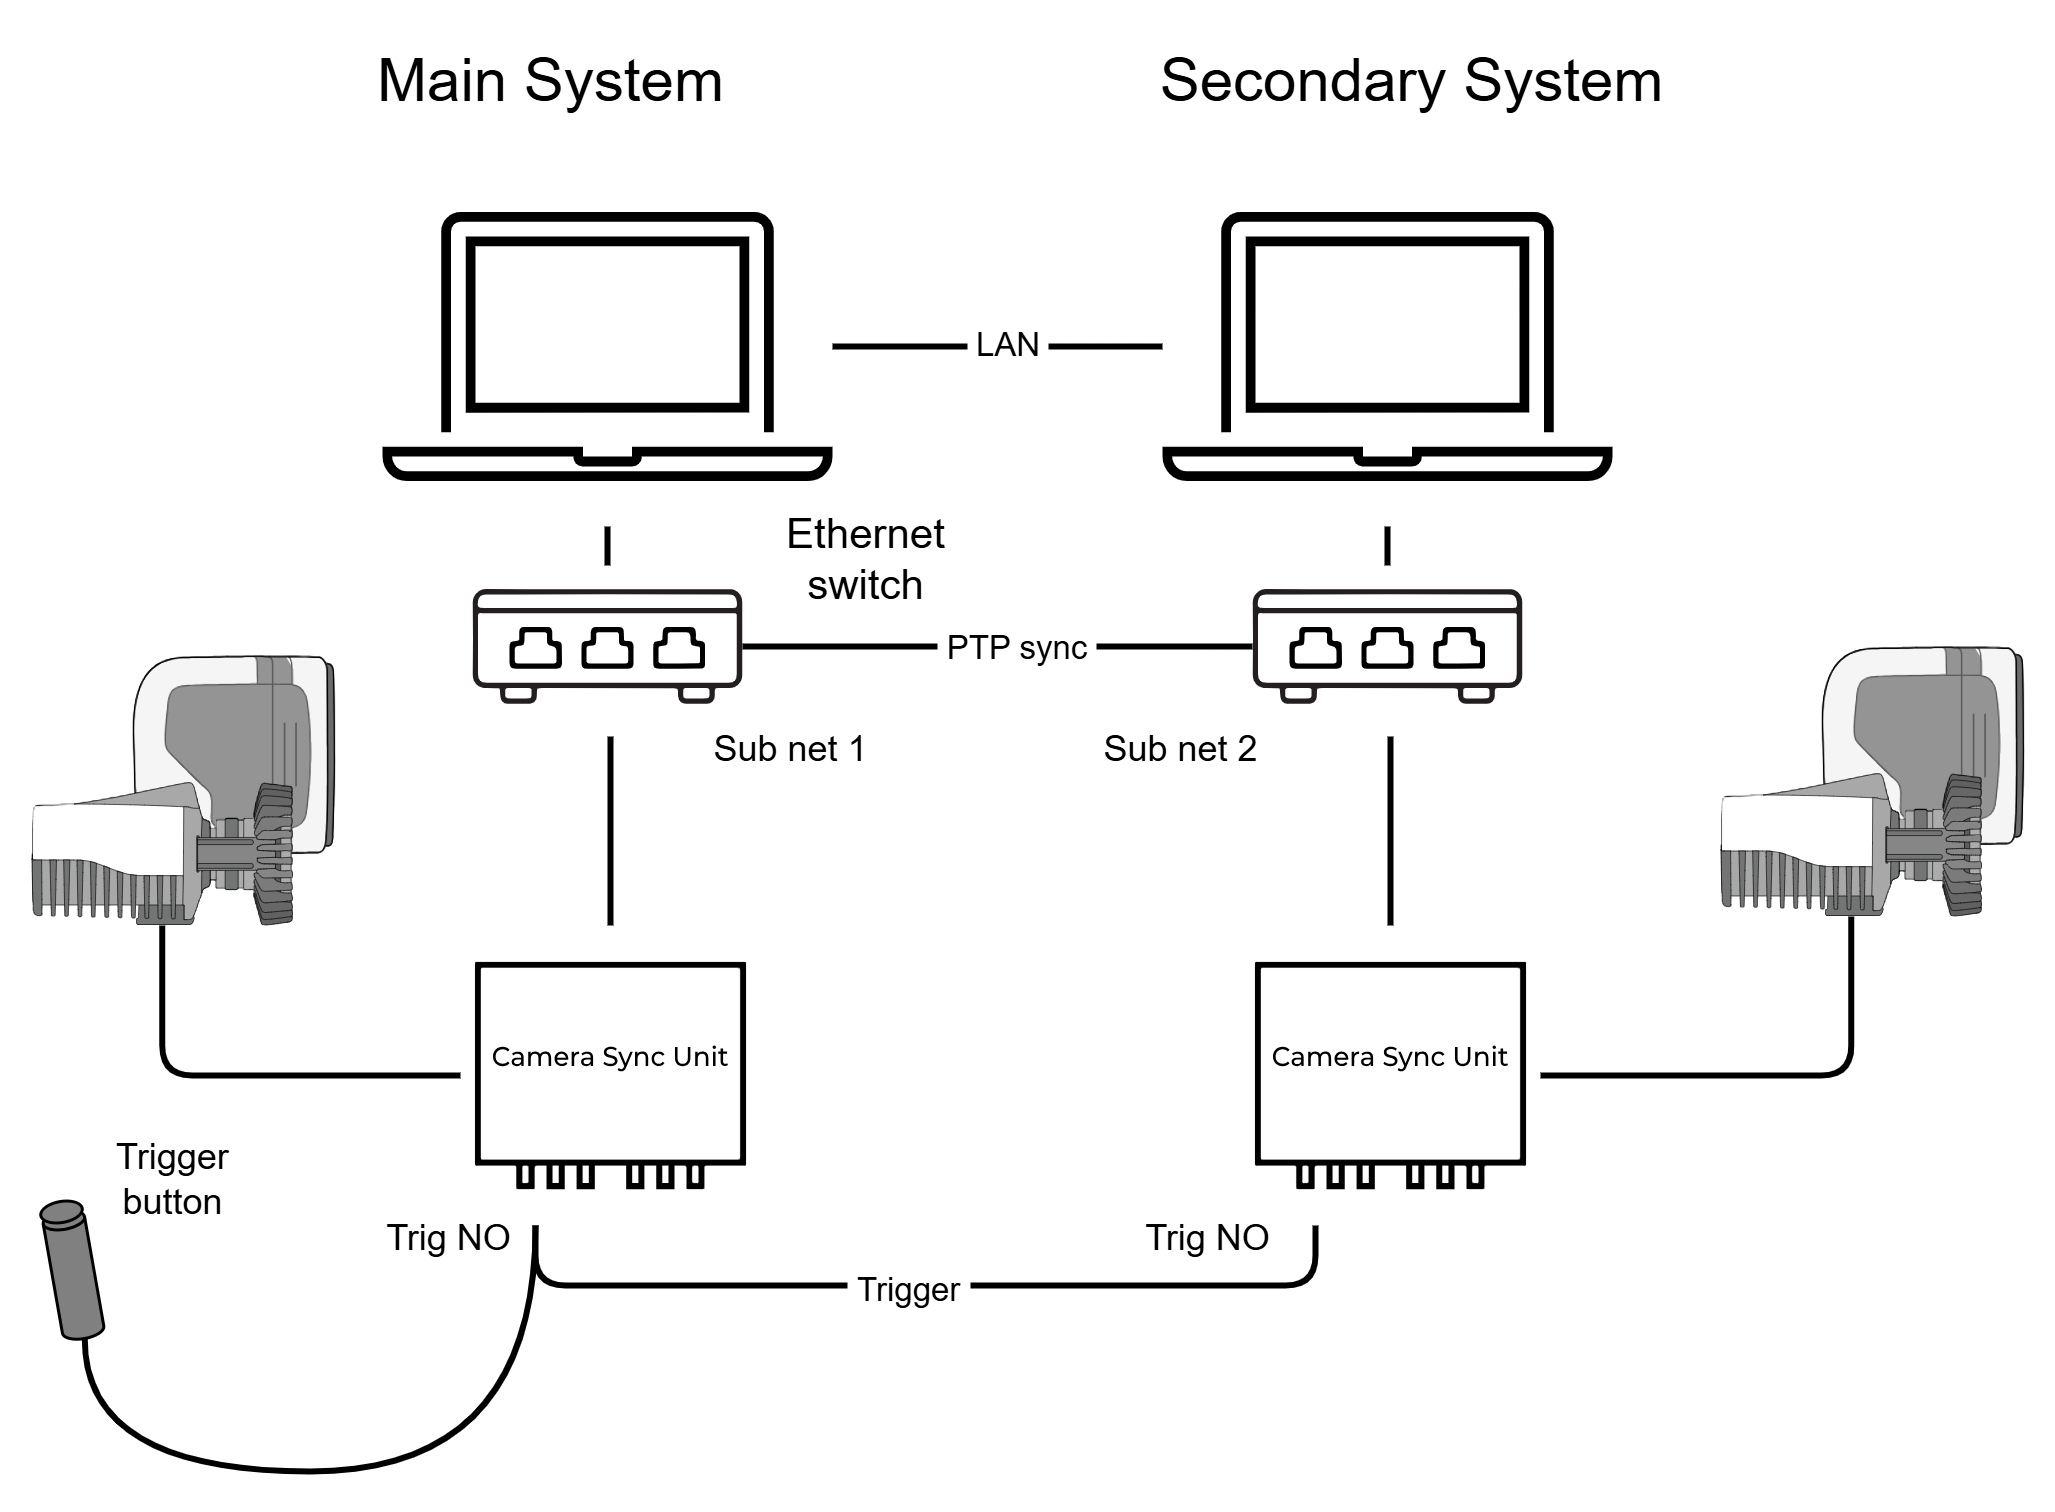
The recommended synchronization method is to synchronize the Twin systems through PTP synchronization. This is the native way in which Qualisys cameras are synchronized, and it avoids the need for External Timebase synchronization to synchronize both systems.
With respect to synchronization, this setup is similar to that for multiple video systems described in chapter How to set up multiple video systems. PTP synchronization is achieved by connecting the Ethernet switches of the respective camera systems. The Ethernet adapters used for the respective camera systems must be configured for two different sub nets in order to distinguish them. QDS block lists are then used to avoid that QDS assigns IP addresses to cameras from the wrong system.
To set up Twin systems with PTP synchronization, connect the systems according to the following instructions.
-
Use QDS to create different sub nets for the camera interface on each computer, for example 192.168.254.1 and 192.168.253.1:
-
Open the QDS Advanced dialog: right-click on the QDS icon
 in the Windows status toolbar, and click Advanced....
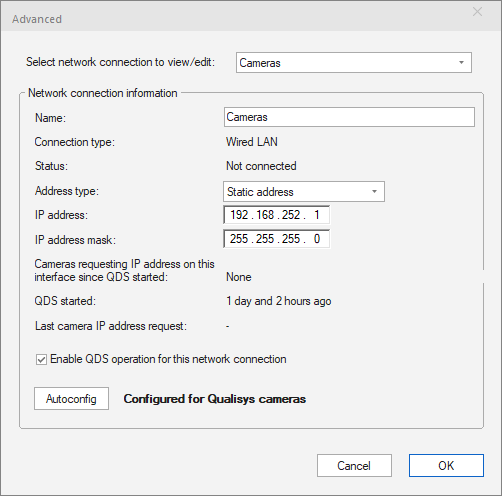
-
Select the network adapter used for the cameras.
-
Make sure that the IP addresses are different for the camera interfaces on the respective computers. By default, QDS uses 192.168.254.1, so you probably need to change one of them, for example to 192.168.253.1.
-
Press OK to apply any changes.
-
If you have your cameras connected, power cycle them so that they receive new IP addresses in case you changed the sub net.
-
-
Set the PTP mode of all cameras and sync units to Standard using the Camera Configuration Tool, see chapter Camera Configuration Tool. Refer to the Camera Configuration Tool manual for instructions.
For Oqus cameras, you need an older QFI version to change the PTP mode, see chapter How to use PTP sync with an external clock master (Oqus) for more information.
-
Edit and enable QDS block lists on each computer to block cameras from the other system:
-
Find the MAC addresses of the cameras and Camera Sync Unit of each system. The easiest way is to locate the system in QTM and copy the System info text.
-
Open the mac_block.txt file with Camera utilities > Camera Blocklist > Edit on the QDS menu.
Add the MAC addresses of the devices included in the other system to the list. Each row in the block list should start with a MAC address. The lines should then look as follows:
CopyC4:19:EC:00:0C:14 S/N 12345
C4:19:EC:00:0C:15 S/N 12346
C4:19:EC:00:0C:16 S/N 12347It is recommended to add the serial number after the MAC address so that it is easier to find which camera it belongs to.
Save the mac_block.txt file when done.
-
Enable the QDS blocklist: right-click on the QDS icon
in the Windows status toolbar, and click Camera utilities > Camera Blocklist > Enable, and make sure that Enable is checked.
-
-
Connect the Ethernet switches of the main and the secondary systems to each other with an Ethernet cable.
-
Connect the trigger button to the Trig NO input of the Camera Sync Units of both systems using a BNC T-splitter.
-
For Oqus systems, use the Trig in connector of the sync/trig splitter cables instead.
-
-
On the main computer, open the Twin System settings and set the capture frequencies for the main and the secondary systems under the Capture frequency header.
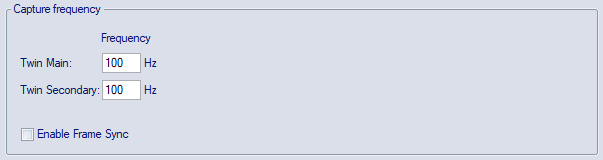
Enable Frame Sync must be unchecked since the systems are already synchronized through PTP synchronization.
When starting a capture, the synchronization settings of both systems are automatically updated to start the capture on trigger.
How to set up Twin systems with hardware synchronization
Alternatively, Twin systems can be configured with hardware synchronization for drift-free synchronization between the two systems. The synchronization uses a 100 Hz continuous signal from the device selected as Frame Sync Source on the Twin System settings page as external timebase for both systems.
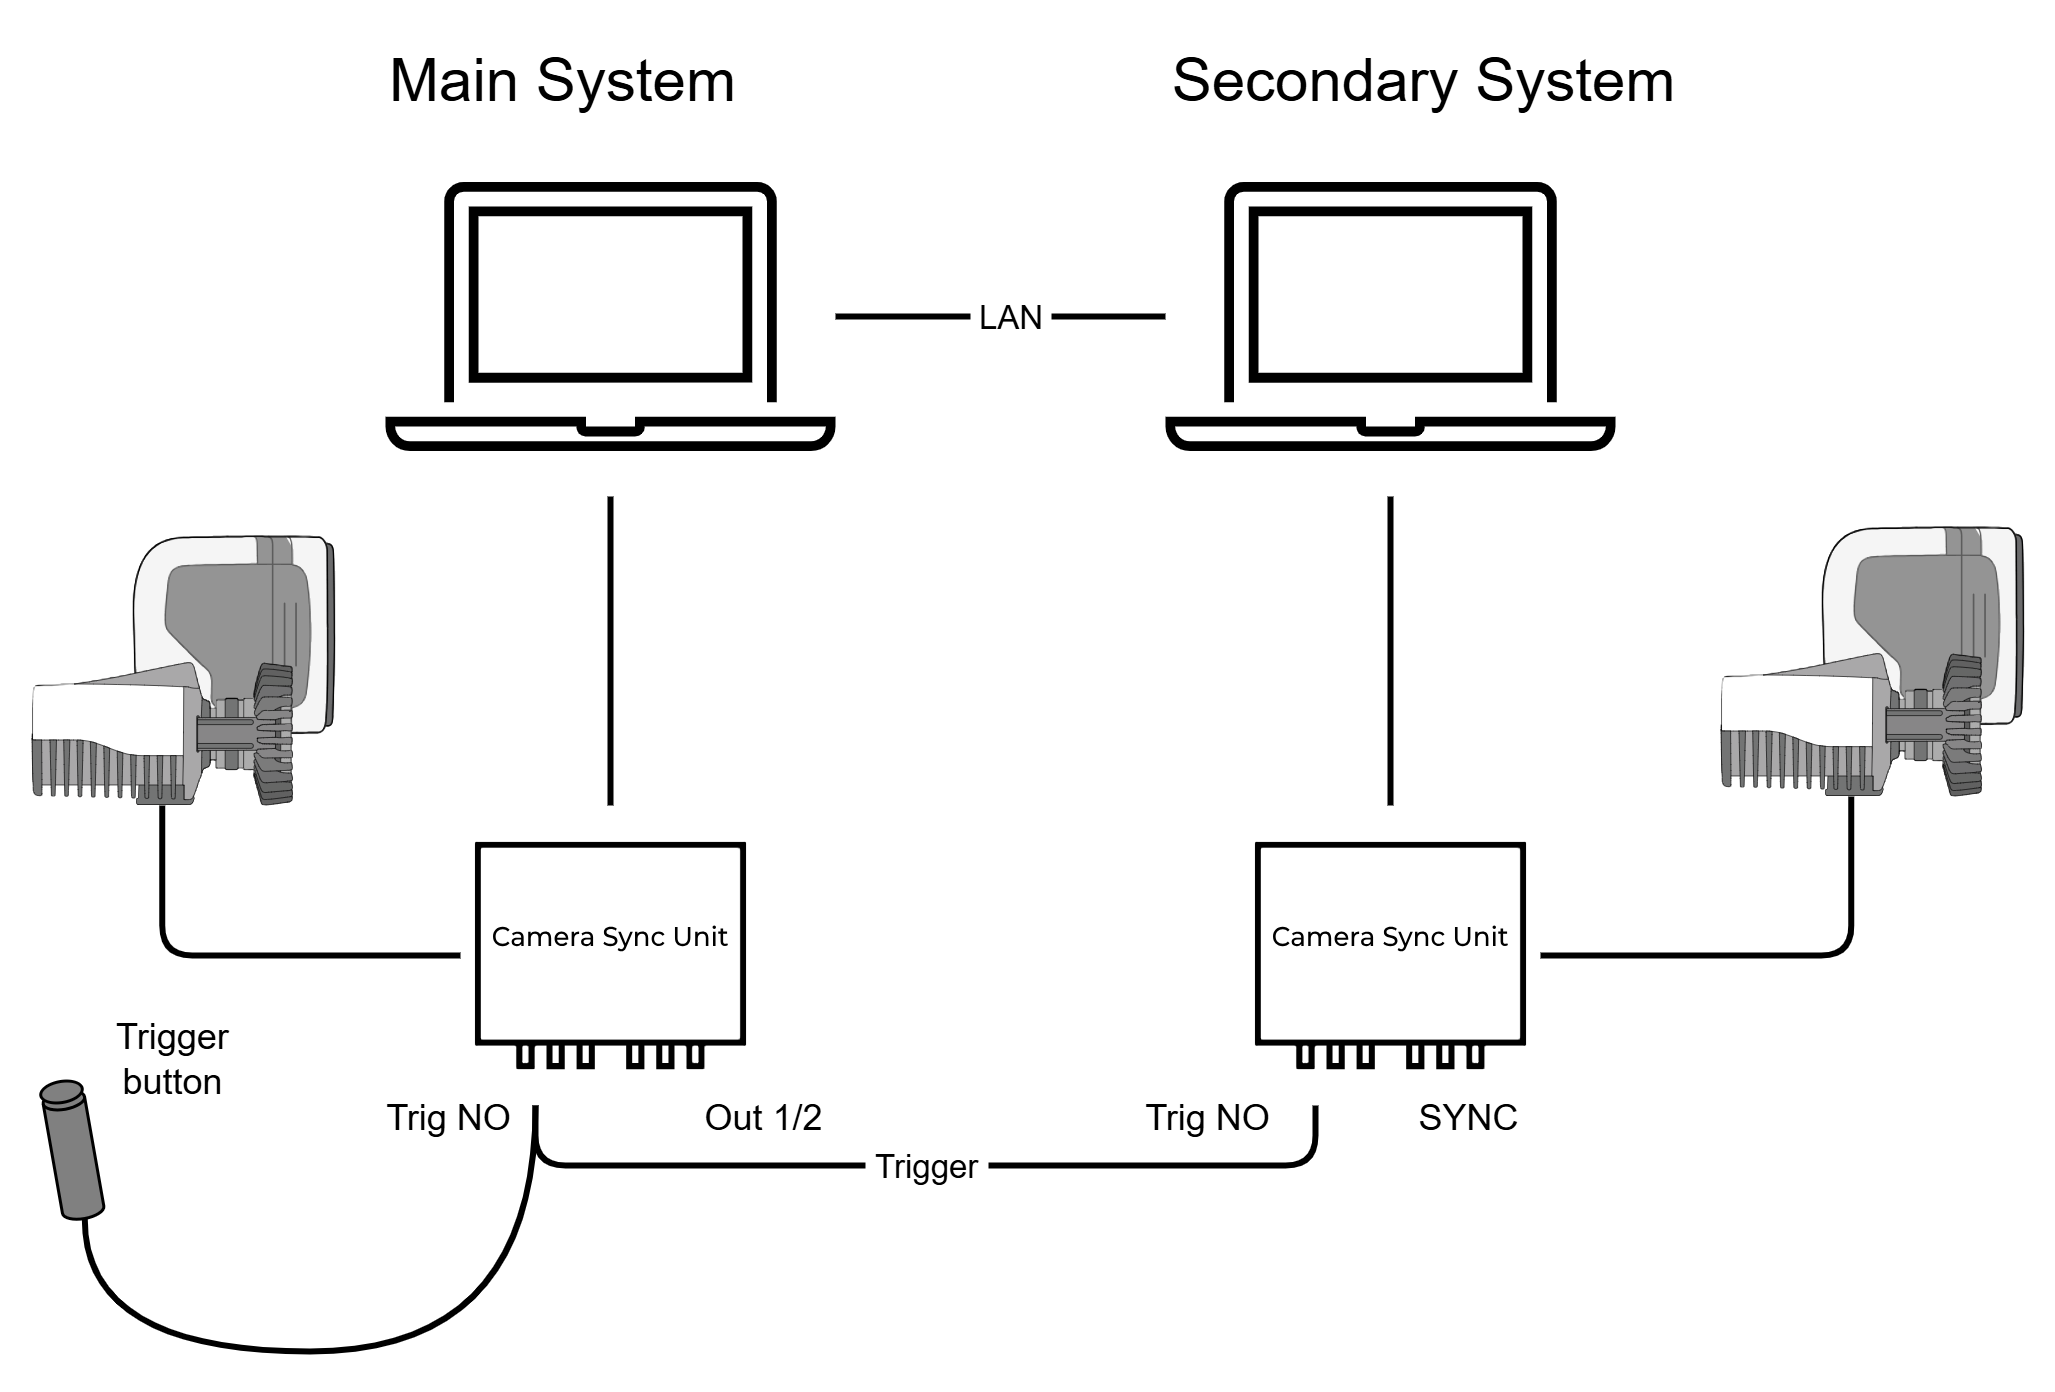
To set up a Twin systems with hardware synchronization, connect the systems according to the following instructions.

-
Connect the trigger button to the Trig NO input of the Camera Sync Units of both systems using a BNC T-splitter.
-
For Oqus systems, use the Trig in connector of the sync/trig splitters instead.
-
-
Connect the Synchronization output (Out 1) of the Camera Sync Unit that is selected as Frame Sync Source to the Synchronization input (SYNC of the Camera Sync Unit from the other system.
-
When you have two Oqus systems, connect the Sync out on the sync/trig splitter connected to the cameras selected as the Frame Sync Source to the Sync in on the sync/trig splitter connected to a camera from the other system.
-
-
On the main computer, open the Twin System page under Project Options > Processing.
-
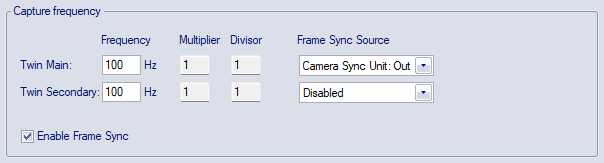
Under the Capture frequency header, check the Enable Frame Sync option.
-
Select the Frame Sync Source from one of the drop-down lists. Most commonly, the Camera Sync Unit: Out 1 port of the Twin Main system is chosen.
Currently, only the Out 1 port of the Camera Sync Unit can be used for Twin System synchronization.
When starting a preview or a capture, the synchronization settings of both systems are automatically updated to use a 100 Hz continuous signal from the Frame Sync Source as external timebase and to start the capture on trigger. When starting a preview for the first time, it may take a while for the systems to synchronize to the external timebase.
How to set up Twin systems with trigger start synchronization
The most basic way to set up Twin systems is to use only a trigger button to synchronize the start of the captures. This method may be used for short captures, or if the synchronization between the Twin systems is not critical. Otherwise, it is recommended to use one of the alternatives with PTP or hardware synchronization.
To set up Twin systems with trigger start synchronization, connect the systems according to the following instructions.
-
Connect the trigger button to the Trig NO input of the Camera Sync Units of both systems using a BNC T-splitter.
-
For Oqus systems, use the Trig in connector of the sync/trig splitter cables instead.
-
-
On the main computer, open the Twin System settings and set the capture frequencies for the main and the secondary systems under the Capture frequency header.
When starting a capture, the synchronization settings of both systems are automatically updated to start the capture on trigger.