Quick Capture (Beta)
Quick Capture is a capture method in which captures are recorded from an uninterrupted stream of motion capture data. Quick Capture processes 2D data while recording and keeps the camera connection open between measurements, which speeds up the starting, stopping, and saving of files. The real-time stream remains live between measurements, allowing for uninterrupted data flow with external client software.
Quick Capture is a beta feature that is still in active development and subject to change.
Requirements and limitations:
-
The camera system must include a Camera Sync Unit or at least one camera in marker mode.
-
Gaps may appear in the processed data if the real-time processing could not keep up with the incoming 2D data samples, although this can be solved by reprocessing.
-
External devices will not be able to use "Simultaneous start" for synchronization with the system.
-
Latency between camera exposure and the real-time server’s output of processed data may increase.
-
The storing of marker rays during capture is not supported, but rays can be generated by reprocessing.
-
When using Miqus video cameras, the final few frames of a measurement may not be included.
-
Oqus cameras and external video cameras are not supported.
Enable Quick Capture
Enable Quick Capture mode in QTM as follows:
-
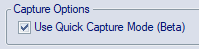
Open the Project Options and navigate to the Camera System page under Input Devices.
-
Enable the checkbox Use Quick Capture Mode (Beta), and press OK.
Quick Capture mode
Once the Quick Capture Mode option is enabled, pressing the Capture button in the Capture toolbar or Ctrl+M puts QTM in Quick Capture mode:
-
The cameras go live and QTM streams real-time data according to the selected Real-time actions on the Project Options > Processing page.
-
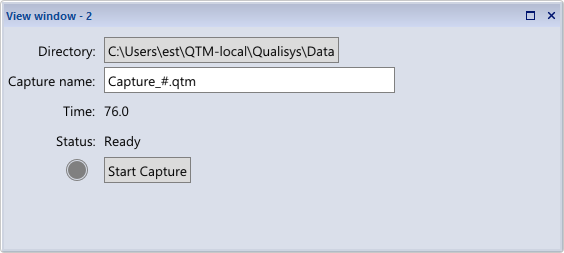
The Quick Capture View window is opened for controlling the captures.
-
The main status bar indicates that QTM is in Quick Capture mode.
When in Quick Capture mode, the cameras are operating according to the actual camera settings, even in between captures, including:
-
Cropped sensor areas,
-
The actual capture frequency, even if it is higher than the maximum capture frequency of the system for the full sensor areas of the cameras.
This behavior is different from streaming during Preview mode, in which the full sensor size of the cameras is used and the real-time frequency is limited to the maximum capture frequency of the system.
Captures are recorded from the ongoing stream of real-time motion capture data. For that reason, the processing options in the Project Options dialog are limited to the Real-time processing actions.
This behavior is different from the standard capture mode, in which captures are preceded by preview mode. The preview mode is interrupted when starting a capture, leading to a short pause in the real-time stream. After a standard capture, the camera connection is closed again, and the capture is automatically post-processed according to the selected Capture actions on the Processing page.
To exit Quick Capture mode, press the Stop capture button, Ctrl+M, or the Esc button.
Controlling captures
When in Quick Capture mode, captures are controlled via the Quick Capture View window. The Quick Capture View window allows you to:
-
Set the Directory for storing the captures.
-
Set the Capture name:
-
You can use a
#character to indicate the position of the incrementing index for subsequent captures -
If the capture name does not include a
#character, an incrementing index is automatically appended to the capture name when the file already exists.
-
-
Start and stop captures:
-
Push the Start Capture button to start a capture when the Status is Ready.
-
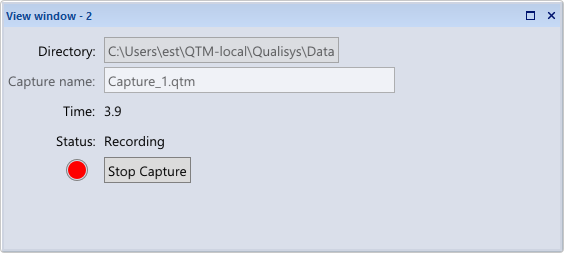
Push the Stop Capture button to stop a capture when the Status is Recording.
-
Post-processing
Captures recorded with Quick Capture store the data calculated during real-time processing. This means that gaps may appear in the processed data if processing needed to be skipped to keep up with the incoming 2D data. In some cases, automatic labeling of trajectories or the accuracy calculated data (e.g. skeleton data) may also be improved by post-processing. Therefore, it is recommended to post-process the files for optimal results. For more information about reprocessing files, see chapter Reprocessing data.