Using Sync out for synchronization
The recommended option is to use the Sync out signal from the cameras. This is the same signal that is used for synchronizing the analog boards. The Sync out signal is a pulse train with a TTL pulse that is only active when the camera is measuring.
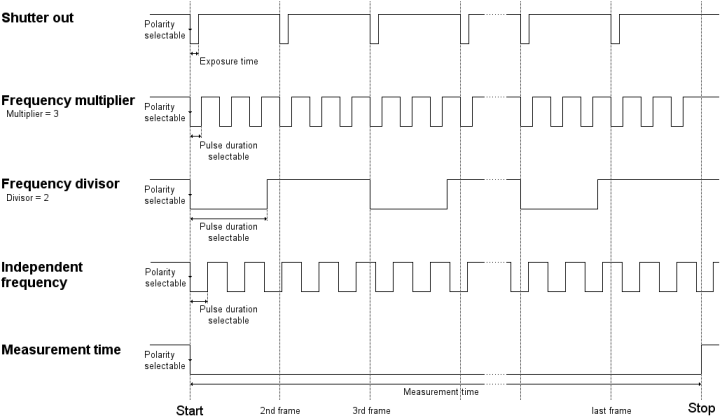
The signal can be modified to give you different signals see chapter Synchronization output, but the default is to send a pulse for each camera frame where the pulse has the same length as the exposure time. The Sync out signal can also be set independently for each camera in the system. Which means that you can set different outputs for different cameras and adapt the output to different hardware. The different outputs of the camera are shown in the image below.
The signal can be used in two different ways:
-
Start the external capture on the first TTL pulse and use an internal frequency
In this mode there will be a small drift, between the external hardware and the camera system. How much it will be depends among other things on the frequencies of the two systems and also the accuracy of the external equipment.
The external capture can also be stopped by the camera system if the Frequency multiplier mode is used and the pulse duration is the same as the period time. Then the signal will for example be low during the whole measurement until it stops, see chapter Synchronization output.
-
Frame synchronize the capture of the external hardware
In this mode there is no drift between the two system because the Sync out signal is synchronized with the camera frequency. For more information on how to get different frequencies see chapter Synchronization output.
If you want to use a sync output signal that is faster than 5000 Hz on the Oqus camera, then it is recommended that you use the connector on the Master camera. The master camera is displayed with an M next to the ID in the camera list to the left of the settings.
In a measurement the pulse train for the default mode with the setting Shutter out will look as the figure below.

-
Preview
During preview a pulse is sent on each preview frame. -
Capture
Click on Capture in the Capture menu. -
Start capture dialog open
When the Start capture dialog is open the pulse continues because the preview is still being updated. -
Start
Click on Start in the Start capture dialog. -
Waiting for measurement
When the camera waits for the start of the measurement the sync output signal is stopped. How long this period is depends mostly on two things.-
With external trigger this period continues until you press the button. Therefore we recommend that you use external trigger so that you have time to initialise the measurement on the external device.
-
Without external trigger the period is less than a second.
-
-
Measurement start
For the default Oqus setting the measurement starts on the negative edge of the first pulse, which means that the external hardware must trigger on the same edge. -
Measurement
During the whole measurement a TTL pulse is sent for each frame. -
Measurement stop
The measurement stops and the Sync out signal is high until the next preview.In batch capture there is a couple of preview frames between each measurement. These preview frames will be seen as pulses on the Sync out signal and must be considered by the external hardware.