How to use frame synchronized twin systems with separate volumes
Follow this procedure to use frame synchronized twin systems with separate volumes, for example a system above water and a system underwater.
Requirements
-
Two Qualisys systems (Qualisys cameras of any type or mixed).
For Oqus systems at least one camera must be from the 3+-, 4-, 5+-, 6+ or 7+-series if you want to use frame synchronization.
-
Synchronization devices or cables. Each system needs its own Camera Sync Unit or Oqus control splitter.
-
A trigger button with BNC T-splitter and BNC cable.
-
Two computers with two Ethernet ports each.
Procedure
-
Set up the two camera systems and connect them to two separate computers.
-
It is important that there is a large plane that connects the two volumes so that you can move the wand in the Twin calibration.
-
-
Calibrate the two systems separately.
-
Connect the free Ethernet ports of the two computers so that they can communicate with each other. Use for example one of the alternatives below:
-
Connect them both to the same internal network.
-
Set static IP addresses on the Ethernet connections and connect a cable directly between the computers.
-
-
Select the system that are going to use the highest frequency as Twin Master system. Usually that is the above water system in above/underwater twin system.
-
Connect the Synchronization output (Out 1 on Camera Sync Unit or Sync out on control splitter) of the device that is selected as Frame Sync Master Source to the Synchronization input (SYNC on Camera Sync Unit or Sync in on control splitter) of the other system.
-
Connect the same trigger button to Trig in (control splitter) or Trig NO input (Camera Sync Unit) on both of the systems.
-
Open the Project options dialog for the Twin Master system.
-
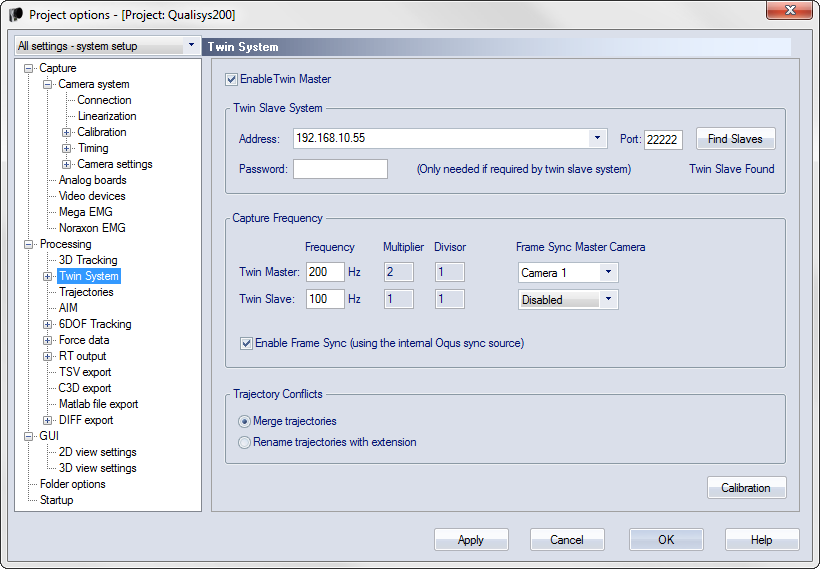
Go to the Twin system page. For more information about the settings, see chapter Twin System.
-
Select the option Enable Twin Master.
-
Click on Find Slaves and select the computer from the list that appears in the Address option.
-
-
Select Enable Frame Sync
-
Enter the desired frequencies of the Twin Master and Twin Slave systems.
-
Select the device that is the Frame Sync Master Source. It should be is the device generating the Sync output. Use the upper drop-down box for the devices in the Twin master system and the lower box for the devices in the Twin slave system.
If you have a system with only Oqus 1, 3 or 5 series cameras, frame synchronization is not supported. The systems will only be start synchronized in this case.
-
-
Select Merge trajectories.
-
Click OK to close Project options.
-
-
The systems are now connected. You do not need to change anything on the Twin slave system, all of necessary settings are controlled by the Twin master system.
-
Start the measurement with Ctrl+N on the Twin master system. Both systems will start up in preview. The first time you start a measurement you will have to wait while the two systems synchronize to the 100 Hz signal.
-
The systems then need to be twin calibrated to align the coordinate systems. For more information on the twin calibration, see chapter Performing a Twin calibration.
-
Click on Calibrate Twin System on the Capture menu.
-
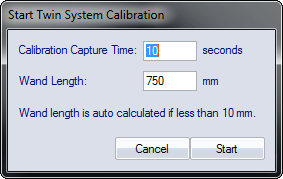
Enter the Calibration capture time you want to use for the calibration. It must be long enough to move the wand twice in the whole plane between the two systems.
-
Enter the Wand length that is used for the twin calibration. If you enter the 0 the wand length is auto calculated but then you must make sure that both markers are in one of the camera systems at the beginning of the measurement.
-
Click OK. The twin calibration is done at the frequency of the Twin slave system, therefore the Twin master system might need to synchronize to the 100 Hz signal again.
-
Start the twin calibration with the trigger button when you are ready.
-
Then move the wand with one marker in each camera system. It is extremely important to move the wand so that you cover as much as possible of the plane between the two systems.
-
When finished you will get a result where it is important to check that the wand length is close to what you expect.
-
-
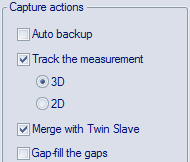
Activate the processing steps that you want to use.
-
Make sure to always activate 3D tracking on both systems. On the Twin slave system it is actually not necessary to activate anything else.
-
Merge with Twin Slave must be activated on the Twin master. Otherwise no data is transferred automatically.
-
Gap-fill, AIM and 6DOF is best to only activate on the Twin master. It can be done on the Twin slave, but it can result in unnecessary dialogs that interrupts the merging process.
-
The export is of course best to do from the Twin master system.
-
-
You can now start doing measurements controlled by the Twin master system.
-
The saving settings on the Start capture dialog controls the behavior of both the Twin master and Twin slave system. This means that it is recommended to save the measurements automatically, because then the Twin slave file is merged automatically with the Twin master file. The Twin slave file is then saved both on the Twin master computer and the Twin slave computer.
-
The Twin master file will contain the 3D data from both systems and can be processed just as any QTM file. The data from the Twin slave system will be labeled with the type Measured slave in the Trajectory info windows. For information on how to work with the twin files see chapter Working with QTM twin files.
-
Any video on the Twin slave system is not transferred to the Twin master computer. Video files recorded with the slave system can be added to the merged capture later by importing the video link via the menu File > Import > Link to Video File.
Video recordings on the slave system will only be saved on the slave computer if automatic saving of the capture is enabled on the master system.
If you import a video from a Qualisys camera that is included in the calibration of the slave system, the calibration information will not be transferred. This means that you cannot apply 3D overlay to the imported video.
-