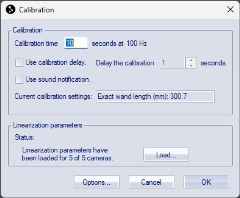
Calibration dialog
A calibration process is started with the Calibration
dialog. It is opened by clicking either Calibrate on the Capture
menu or the Calibration icon ![]() .
.
The frequency in the calibration is fixed at a value of 100 Hz, independent of the used capture rate. This frequency is set to ensure a good number of frames in the calibration and to give a good visualization when the calibration is tracked. The frequency will be lowered if the camera system cannot measure at 100 Hz with the current settings.
The dialog contains the following information and settings:
-
Calibration time
Set the duration of the calibration. Make sure that the calibration time is sufficient to cover the whole volume that needs to be calibrated without rushing.
For longer calibration times, it is recommended to increase the Maximum number of frames used as calibration input parameter in the calibration settings.
For Fixed camera calibration the length of the calibration is not especially important, since the data of the frames is averaged. Therefore, the minimum calibration time of 10 seconds can be used.
-
Use calibration delay
Check this option if you want to have time between pressing the button and starting the calibration. You can specify the delay in seconds .
-
Use sound notification
Check this option if you want to get a sound notification from the computer when the calibration is started and stopped.
-
Current calibration settings
The text box shows information about the current calibration settings.
-
Linearization parameters
The linearization parameters tab shows the status of the linearization. The linearization files must be specified, otherwise, you cannot start the calibration. Click Load if the files have not been specified.
The dialog contains the following buttons:
-
Options
Open the Calibration settings to modify the settings in case they are not correct.
-
Cancel
Quit the Calibration dialog.
-
OK
Start the calibration.
