Setting up Cometa Systems in QTM
Add input device
To add the Cometa Systems device to QTM, follow these steps:
-
In QTM, open the Input Devices page in Project Options.
-
Click the Add Device button, select Cometa Systems from the list, and click OK to add it to the Input Devices list.
-
Check Cometa Systems in the Input Devices list. This will add the Cometa Systems settings page under Input Devices > EMGs.
Device settings
The Cometa Systems configuration is managed via the Cometa Systems settings page under Project Options > Input Devices > EMGs.
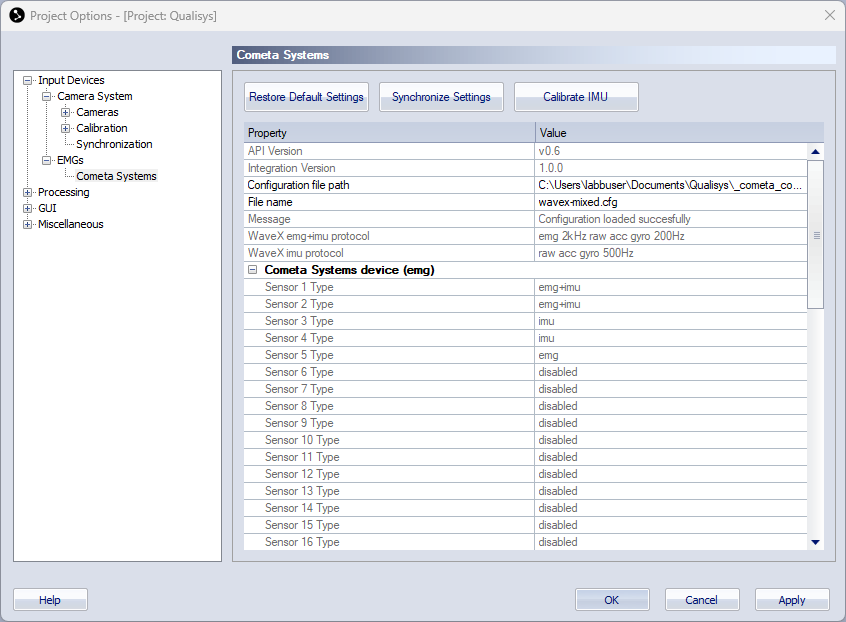
The Cometa Systems settings page contains the following buttons to communicate with the device and a list with settings for the sensors included in the configuration.
-
Restore Default Settings
Reset settings to their default values. -
Synchronize Settings
Synchronize changed settings with the Cometa Systems device. -
Calibrate IMU
Calibrate the IMU sensors.
The settings list contains a top section with common settings and a section with sensor information.
-
Common settings
The common settings are always visible.-
API version
The API version used when creating the integration. Hover over the version number to compare with the API version used by QTM. -
Integration version
The version number for the integration. -
Configuration file path
Text field for specifying the path at which the Cometa configuration files are stored. -
File name
Name of the selected configuration file. If there are multiple configuration files, they can be selected from the dropdown menu. -
Message
Display of messages from the Cometa Systems device. -
Protocol information
Information about the used protocols and sample rates. In case of multiple sample rates, all channels are resampled to the highest sample rate.
-
-
Cometa Systems device (EMG)
List of sensors and their status or type according to the used configuration. Note that one sensor can be associated with multiple data channels.
Configuration in QTM
Select sensor configuration
Follow these steps to select the sensor configuration that you created earlier with the EMGandMotionTools software (see chapter Sensor configuration):
-
In Configuration file path, specify the folder name containing the stored Cometa sensor configurations.
-
Press the Synchronize Settings button.
-
Under File name, select the configuration file you want to use.
-
Press the Synchronize Settings button again. The message filed should now show that the Configuration was loaded succesfully, and the protocol and channel information should be updated.
Synchronization settings
The synchronization output port (Out 1 or Out 2 on the Camera Sync Unit) connected to the Cometa trigger box must be configured as follows:
-
Open the Synchronization page under Project Options > Input Devices > Camera System.
-
Go to the settings for the used synchronization output (Out 1, Out 2 or Synchronization output), and configure it as follows:

-
Mode: System live time
-
TTL signal polarity: Negative
-