Delsys Trigno Integration
This chapter describes the Delsys Trigno integration in QTM. This integration supports Delsys Trigno Centro and Delsys Research+ systems.
Hardware requirements
The following base stations are supported:
-
Delsys Trigno Centro
-
Delsys Research+
A Delsys Trigger module is required for recording synchronized data with a Delsys Research+ System.
For both types of base stations, all sensors that are compatible with Delsys Trigno Discover software are supported.
For the synchronization, you need a Qualisys system with a Camera Sync Unit. If you have an Oqus system, you need a sync/trig splitter cable (art. 510870) connected to the control port of one of the cameras.
For Oqus users.
If you are connecting an analog board or force plates in addition to your EMG system, you will need a second sync/trig splitter cable. This will be used to connect the other external system through the control port of a different Oqus camera. Please contact Qualisys Sales if you need to purchase a second splitter.
Software requirements
The following software is required for configuring and using Delsys Trigno with QTM:
-
Delsys Trigno Discover, version 2.0.1.3 or higher.
Please, refer to Delsys resources or support for more information about version requirements and download.
Make sure that the latest compatible version of the Delsys Trigno integration for QTM is installed. Follow these steps to download and install the integration:
-
In QTM, open the Input Devices page under Project Options.
-
Click the Download device drivers link.
-
Download the installer for the Delsys Trigno integration.
-
Run the installer.
If you need to update Delsys Trigno Discover software of the Delsys Trigno integration for QTM, you must first uninstall the previous version before running the installer.
Hardware setup
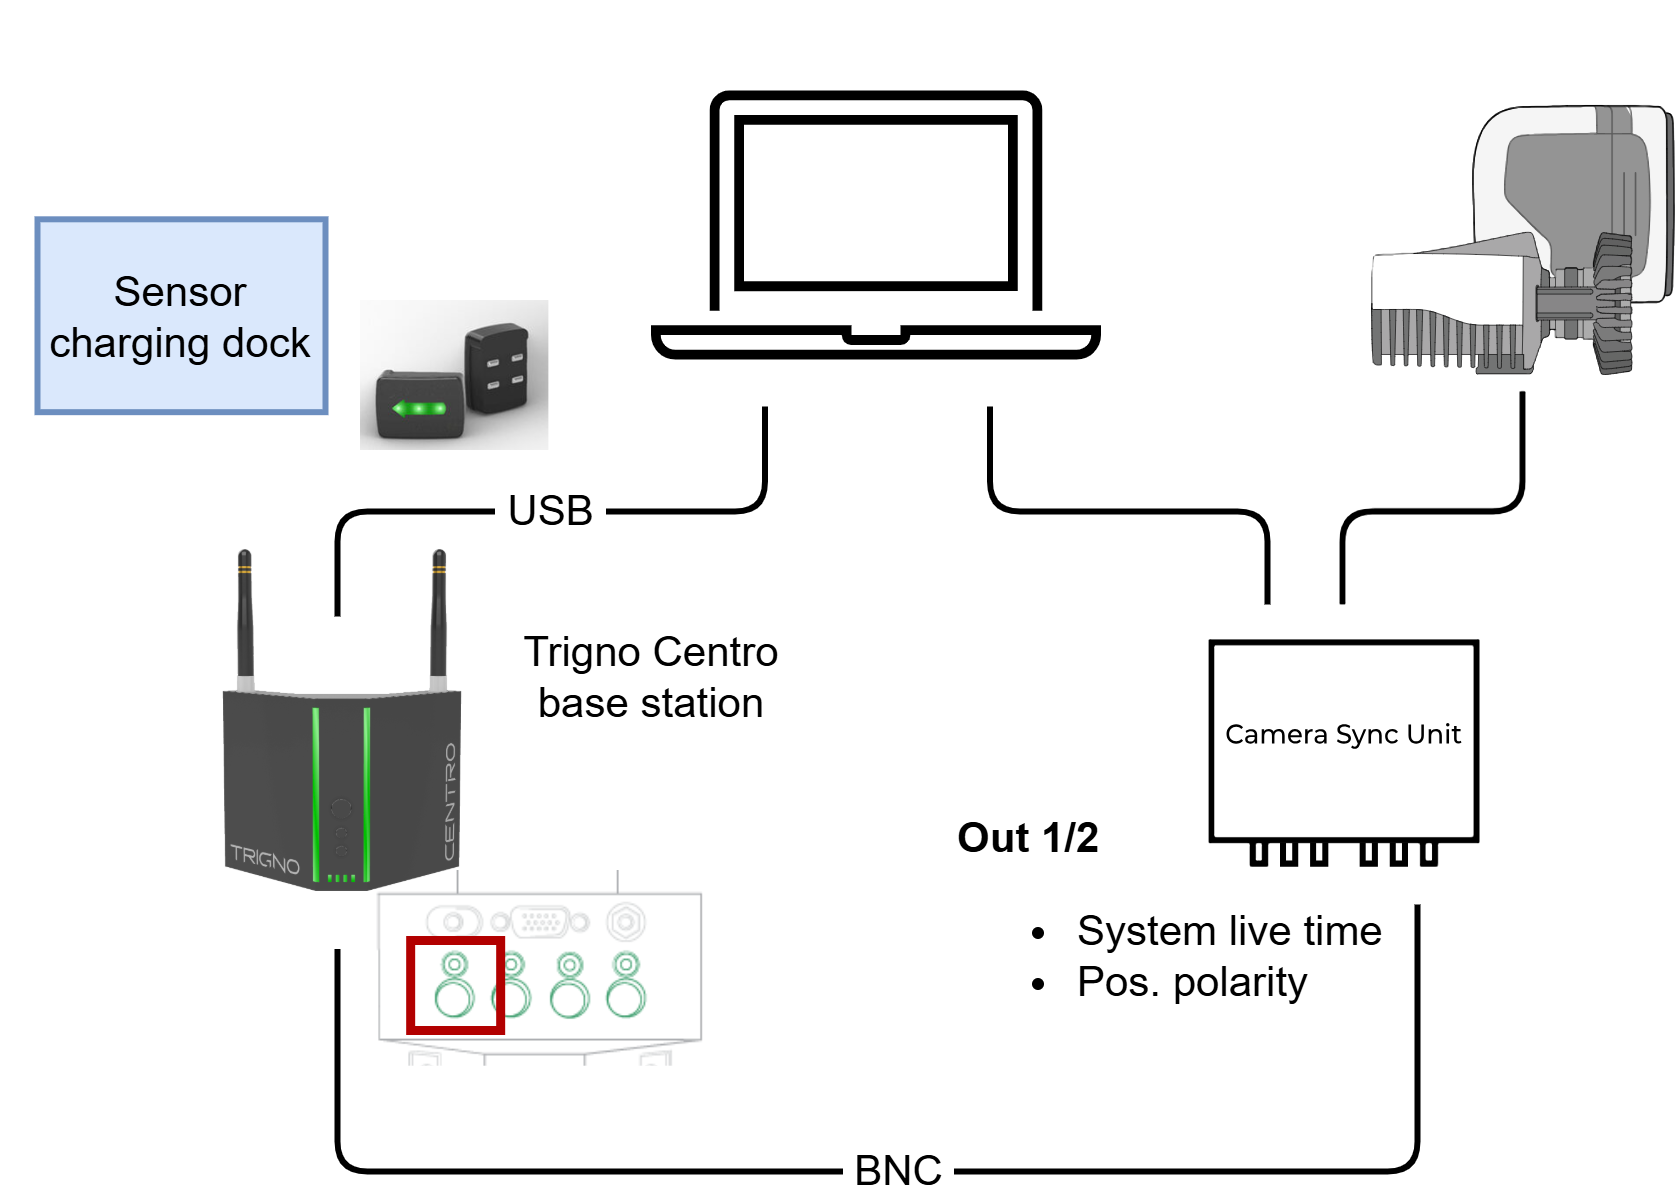
Delsys Trigno Centro
The base station is connected as follows:
-
Connect the Delsys Trigno Centro base station to the computer via USB.
-
Connect the Out 1 or Out 2 port of the Qualisys Camera Sync Unit to the first trigger input of the base station with a BNC cable. If you are using an Oqus camera as sync device, use the Sync out connector of the Sync/Trigger splitter.
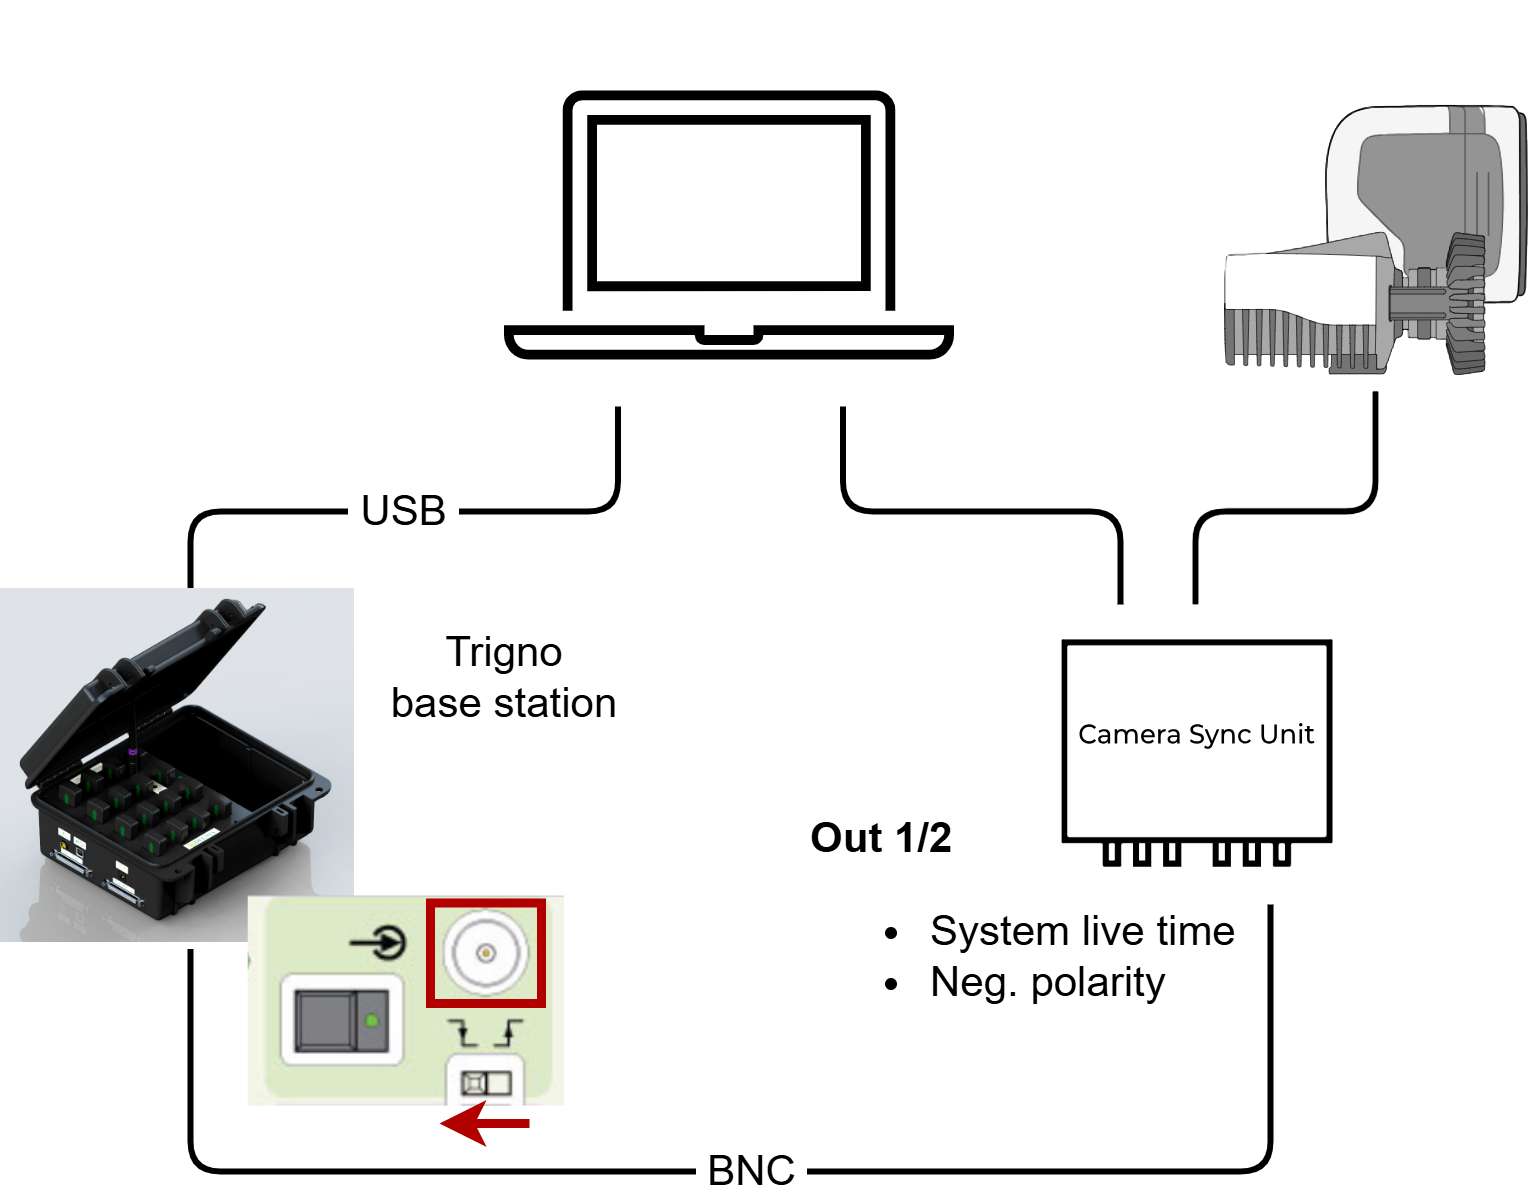
Delsys Research+
The base station is connected as follows:
-
Connect the base station to the computer via USB.
-
Connect the Out 1 or Out 2 port of the Qualisys Camera Sync Unit to the Trigger input of the Delsys Trigger module with a BNC cable. If you are using an Oqus camera as sync device, use the [Trig in/Sync out] connector of the Sync/Trigger splitter.
Sensor configuration
Before using the Delsys device with QTM for the first time, the sensors must be configured with the Delsys Trigno Discover software. This is done in a similar way for Delsys Trigno Centro and Delsys Research+ systems. Follow these steps to set up and configure the sensors:
-
Connect the Delsys base station to the computer with USB and make sure it is switched on.
-
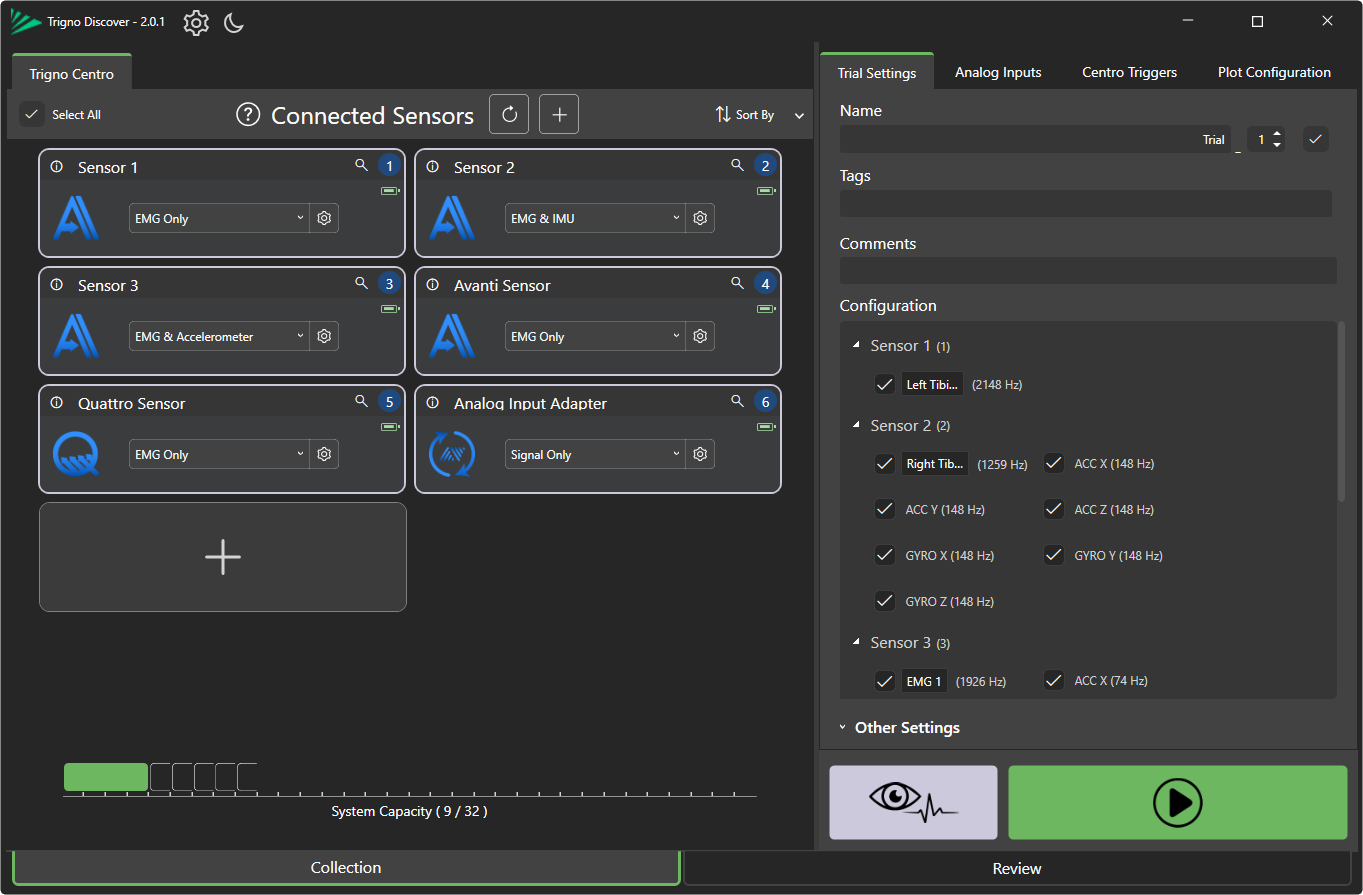
Open the Delsys Trigno Discover software.
-
To add sensors, press the + button, pair the first sensor and continue pairing the subsequent sensors. For detailed instructions, see the Delsys Trigno Discover manual.
-
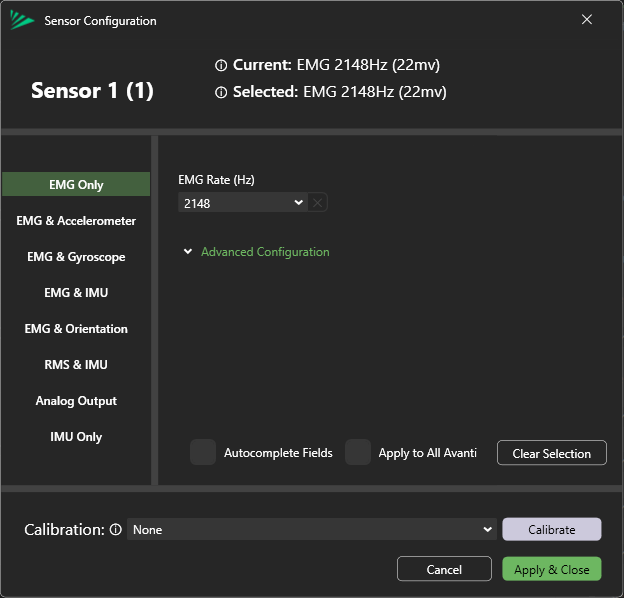
To choose the sensor mode, press the gear icon for a sensor, and specify the sensor mode and sample rates in the Sensor Configuration dialog.

-
In the Trial Settings tab, specify the channel names for the channels of the respective sensors.
-
Press the Preview Stream button and let the data run for a couple of seconds to apply the configuration.
-
Close the Delsys Trigno Discover software.
For more detailed information, please refer to Delsys help resources or support.
Setup and configuration in QTM
Add input device
Add the Delsys Trigno device to QTM:
-
In QTM, open the Input Devices page under Project Options.
-
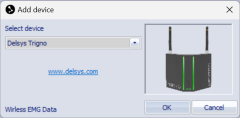
Click the Add Device button and select xxx in the drop down menu.
-
Check the Delsys Trigno item in the Input Devices list. The Delsys Trigno device should now show up as an input device under the EMGs category.

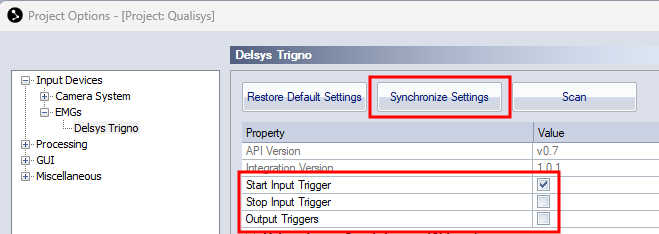
Device settings
The Delsys Trigno device settings are managed via the Delsys Trigno settings page.
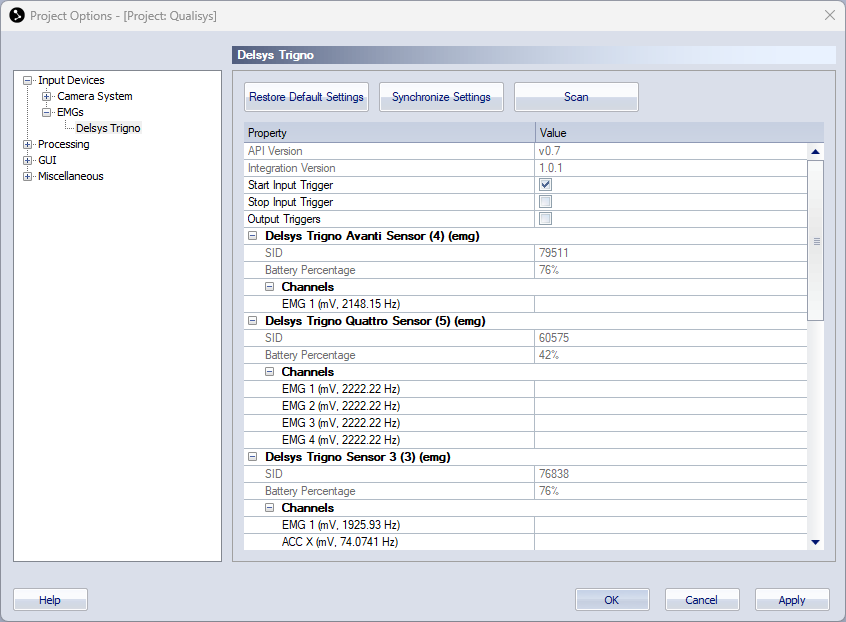
The Delsys Trigno page contains the following buttons to communicate with the device and a list with settings for the sensors included in the configuration.
-
Restore Default Settings
Reset settings to their default values.
-
Synchronize Settings
Synchronize changed settings to the [xxx] device.
The settings list contains a top section with common settings and a section with individual settings for each [device/sensor].
-
Common settings
The common settings are always visible.
-
API version
The API version used when creating the integration. Hover over the version number to compare with the API version used by QTM.
-
Integration version
The version number for the integration.
-
Start Input Trigger
Check to use hardware synchronized start.
-
Stop Input Trigger/Output Triggers
Not used.
-
-
Individual settings and information for each sensor
The individual settings are displayed for the sensors included in the configuration.
-
Sensor name, number and type
Each sensor name start with Delsys Trigno, followed by the sensor name, number and type.
-
SID
Serial number of the sensor.
-
Battery Percentage
Indication of the charge level of the battery. Press the Synchronize Settings button for updating the reading.
-
Channels
Information about the channels of the sensor (channel name, units, sample frequency).
-
Configuration in QTM
Setting up Delsys Trigno in QTM
Follow these steps to set up the Delsys device and sensors in QTM:
-
Make sure that the base station is connected to the computer, and that it is switched on.
-
Take out the sensors from the charger and switch them on by holding them against the lock decal on the charging dock.
-
Open the Delsys Trigno settings page under Project Options > Input Devices > EMGs.
-
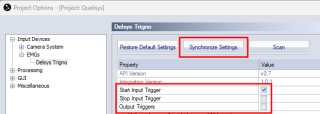
Enable the Start Input Trigger check box, and disable the Stop Input Trigger and Output Triggers checkboxes.
-
Press the Synchronize Settings button.
During the “Synchronize Settings” process, a Windows “switch to” dialogue box may pop up. Select “switch to”, which will bring up the windows panel, and then this can be closed by clicking outside of it.
-
Check that the sensor settings are correct, as configured in the Trigno Discover software.
-
In case you enable or disable sensors, press the Scan button to update the sensor list.
-
-
Press OK to close the Project Options dialog.
Synchronization settings
To configure the synchronization, follow these steps:
-
In QTM, open the Synchronization page under Project Options > Input Devices > Camera System.
-
Use the following settings for the used port Out 1, Out 2 or Synchronization output (Oqus cameras):
-
Mode: System Live Time
-
TTL signal polarity:
-
For the Trigno Centro base station: Positive

-
For the Research+ base station: make sure that the polarity corresponds to the polarity switch on the Delsys Trigger module.
-
-

Capturing, viewing and exporting data
To stream or collect data with Delsys Trigno, simply start a preview or a capture in QTM.
To view the Delsys Trigno data during preview or in a capture, open a Data Info window via the View menu (keyboard shortcut Ctrl + D), right-click in the window and select Display Analog data.
When exporting to C3D, the analog data will be resampled to the closest integer multiple of the capture frequency, or higher depending on all analog data stored in the QTM file, see chapter C3D file format.