Qualisys active markers
Active markers can be used in situations when it is hard to use passive markers, for example, when measuring outdoors at long distances, or when there are many unwanted reflections from the measured object or the capture volume. In addition, the Active/Naked Traqr and the Short Range Active Marker use sequential coding for automatic identification of markers or rigid bodies.
How to use active markers
QTM settings for active markers
When using active markers you need to specify the correct marker type in the Project Options under Cameras > Marker Mode. The following active marker options are available:
-
Active
Use this mode for the sequentially coded active markers: Active or Naked Traqr or the Short Range Active Marker. In this mode the camera strobes are used to send a pulsed signal ahead of the exposure to trigger the active markers. Only active markers are visible as the camera strobe is inactive during exposure. -
Active + Passive
In this mode the camera will capture both passive and sequentially coded active markers. This mode can be used if you need to add some temporary markers to the subject and do not want to add active markers. If you mix the passive and active markers all the time you lose some of the advantages of both types -
Long range spherical active markers (or reference markers)
Use this mode for the Long Range Active Marker or reference markers. -
Untriggered active markers
Use this mode when you are using generic continuously lighting active markers. In this mode the cameras strobes are inactive.
How to use sequential coding
Sequential coding is implemented in the Active and Naked Traqr and the Short Range Active Marker. By using sequential coding, the trajectories are automatically identified in QTM without the need of an AIM model or a rigid body definition.
The sequential coding configuration and supported options depend on the type of active marker and the camera system.
-
Active/Naked Traqr
The Active and Naked Traqr is configured using the Traqr Configuration Tool. The Traqr Configuration Tool can be used to set the ID range and the marker IDs of the individual markers on the Traqr. The Traqr supports the use of the extended ID range option. The ID range is a global setting that applies to the whole system. The options are:-
Standard (1-170)
Standard ID range of 170 uniquely defined markers. This is the default option. -
Extended (1-740)
Extended ID range of 740 uniquely defined markers. Use this option if you have more than 170 markers. This option is only supported with Arqus or Miqus cameras. The extended range option cannot be used if there are any Oqus cameras included in the system.
-
-
Short Range Active Marker
The IDs of the markers are controlled by the switch on the driver unit and the connector that the marker chain is attached to. For example driver ID = 2 and the second marker connection will give you marker IDs 41-48. The Short Range Active Marker can only be used with standard ID range. The settings on the driver allow for a maximum of 160 uniquely defined markers.
Depending on the ID range the identification needs at least 21 or 41 frames to identify the trajectories. When the trajectory is shorter, for example due to occlusions, the ID will be set to 0. For the best results with active markers it is important to optimize the camera setup to avoid fragmentation of trajectories.
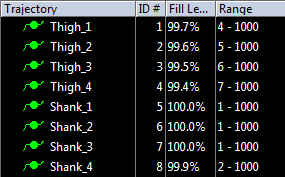
The IDs of the markers are displayed in the ID# column of the Trajectory info windows. QTM will automatically join all of the trajectories with the same ID. However you can manually join any trajectories with an ID with a trajectory with ID 0, by dragging the one with ID to the one without ID. The merged trajectory will get the ID of the identified trajectory. You can undo the merge with the Undo command. It is not possible to change the ID of an identified trajectory.
To automatically label the trajectories with labels of your choice you need to make an AIM model. However, in this case you do not need any movement or correct placement of the markers to create the AIM model. You just capture a file with the correct marker IDs and then label them as you want to place them on the subject. Create the AIM model and the next time you apply the AIM model the trajectories will be labeled according to their marker ID.
In the Passive and Active mode the AIM model does not work the same way as when you only have active markers.
How to use Active + Passive mode
The Active + Passive mode can for example be used in setups where you need to add some temporary markers for a static model. In that case it is often easier to add passive markers than to add more sequentially coded active markers. There is however disadvantages to the mixed mode and it is therefore not recommended to be used in all of your measurements. The disadvantages compared to just using the active markers are the following.
- The maximum frequency is reduced to 250 Hz because you need to flash the strobe both to activate the active marker and to see the passive markers. This also means that you will have less exposure time for the markers for example at 250 Hz the maximum exposure time is 210 µs.
- There can be unwanted reflections in shiny materials, because you have a flash of light during the exposure for the passive.
- If the AIM model includes both passive and active markers it has to be created from a file with the correct marker placement.
- It can be harder to identify the correct IDs for the active markers, since a passive marker that is badly tracked can be mistaken for an active marker.