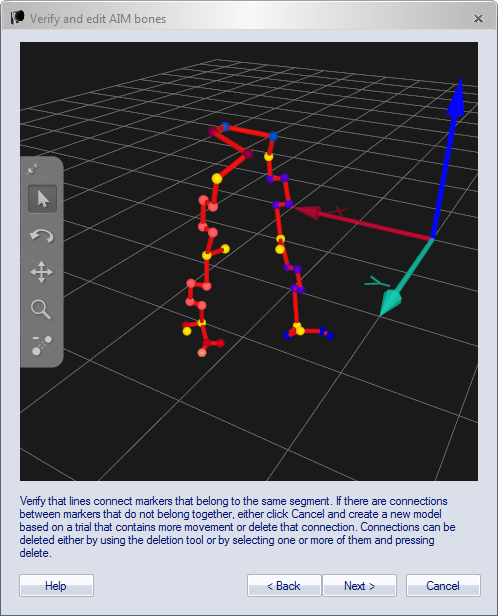
How to verify and edit AIM bones
When an AIM model is created there are AIM bones created automatically between the markers that have least movement between them throughout the file. Because these AIM bones are then kept even if you add more measurements it is important that they are correct. Therefore there is a step when creating a new AIM model where you can verify and edit the AIM bones.
-
The AIM bones are displayed as red bones between the markers.
-
There is no relationship between the AIM bones and bones created by the user.
-
The number of AIM bones are as few as possible.
-
You can rotate, translate and zoom the 3D image of the AIM bones.
-
You can delete AIM bones with the Delete bone tool, see below.
-
The frame used for displaying the AIM model is the first frame that include all or as many as possible of the markers.
To verify that the AIM bones are correct follow these instructions:
-
Check that all of the markers are displayed. If there are missing markers it means that there is no frame with all of the markers. It is recommended to use another file where all of the markers are available in at least one frame.
-
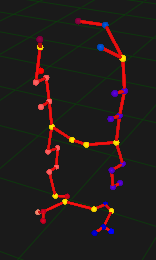
Check that the AIM bones are connected between the correct segments. For example if you are creating a model of a person that has been standing still then the knees and feet may be connected with AIM bones, see image below. Then use the Delete bone tool to remove the bones or select the bone and press Delete. Every time a bone is deleted AIM will look for a new solution, so you may have to delete several bones before you have an acceptable solution. This is especially true if the measurement is static, then it is often better to create a new file with more movement.
-
The AIM bones may not look as good as your user created bones, but that does not necessarily mean that it is wrong. For example, the AIM bone between a head and the body can look strange if the marker nearest to the head is on the shoulder.