Spikes
Spikes are to be understood as discontinuities between consecutive frames within a trajectory. The Trajectory Editor can be used as a tool to detect spikes. Two common types of spikes are due to:
-
Tracking artifacts, for example due to occlusions or partial occlusions of markers in one or more cameras.
-
Labeling artifacts, for example due to swapping of adjacent markers.
Tracking artifacts can generally be kept to a minimum by optimizing camera setup, camera settings for the best possible visibility and distinction of markers, as well as by optimizing the tracking parameters. Labeling artifacts can be avoided by using an appropriately trained AIM model (see chapter Automatic Identification of Markers (AIM)), or repaired by swapping parts (see chapter Swap parts). As a final step in the processing of data, the resulting spikes can be edited in the Trajectory Editor.
Detection and selection of spikes
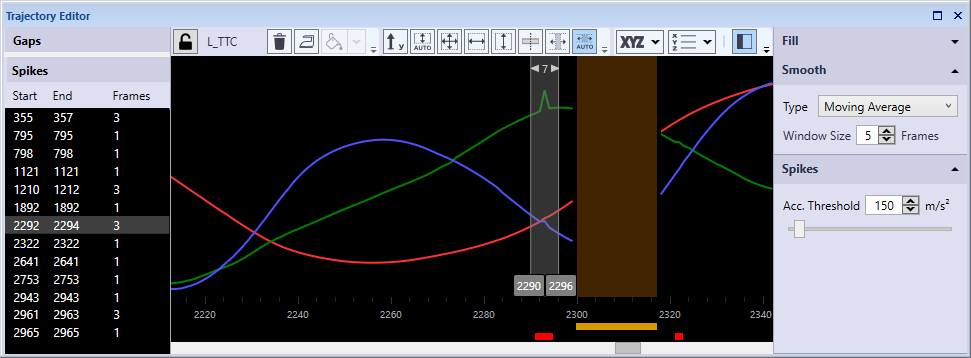
The detection of spikes is based on an acceleration threshold, which can be adjusted in the Settings Sidebar of the Trajectory Editor window.
Spikes are indicated in the plot area by a red indicator below the time axis. The spikes are also listed in the Spikes panel in the Points of Interest sidebar.
You can select a spike by clicking on the corresponding indicator below the time axis. The selection range is then set from four frames before the start to four frames after the end of the spike.
Alternatively, you can select spikes in the Spikes panel in the Points of Interest sidebar. By holding the Shift key you can select multiple spikes. The selection range is then set from four frames before the start of the first spike to four frames after the end of the last spike. When double clicking on a spike in the Spikes panel, the current frame will be moved to the start of the selection.
Smoothing
To smooth spikes follow these steps:
-
Select the trajectory you want to edit. You can select the trajectory in one of the Trajectory info windows, or by clicking on the marker in the 3D view window.
-
Select a spike or a frame range that includes the spikes you want to smooth.
-
Press the Smooth button.
The spikes included in the selected range will then be smoothed using the Type specified in the Smooth settings. The edited parts of the trajectory are indicated as type Edited in the Trajectory info window.
When applying smoothing to a selection, the whole selected range will be smoothed, not only the detected spikes.
The following smoothing types are available:
-
Moving Average
Smoothing by means of a unweighted moving average across a centered window. The Window Size can be set by the user. The Moving Average type is most suitable for smoothing of local spikes.
-
Butterworth
Smoothing by means of a fourth order Butterworth low-pass filter. The Butterworth type is most suitable for reduction of high-frequency noise across large frame ranges. The available options are:
-
Cutoff: Cutoff frequency specifying the pass band and the stop band of the filter. As a rule of thumb, the cutoff frequency should be a factor 2-3 higher than the highest frequency of interest.
-
Alternatively, spikes can be removed by means of deleting and gap filling. To delete a spike, you can select a frame range and delete it by pressing the Delete button, or by pressing the Delete key on the keyboard.
Notes on the Butterworth filter:
-
The minimum frame range for the Butterworth filter is 7 frames. This minimum also applies to the size of parts in case the selected frame range includes gaps. When the selected frame range includes parts that are smaller than 7 frames, the Butterworth filter cannot be applied.
-
The Butterworth filter is applied in forward and reverse direction to compensate for the latency of the filter. The order and cut-off frequency are adjusted so that the effect of the filter is in accordance with the specified order and cutoff frequency when applying the filter in one direction.