Setting up Tobii Pro Glasses 2 in QTM
Set up and configuration in QTM
To connect the Tobii Pro Glasses 2 eye tracker to QTM, the QTM computer and the Tobii Recorder must be connected to the same local network. The Tobii Recorder can be connected via WiFi. Follow these instructions to add Tobii to your project:
-
Configure the Tobii glasses network connection (WiFi) using the Tobii Pro Glasses Controller application.
-
To add the Tobii eye tracker device, open the Input Devices page in the Project options dialog and click on Add device.
-
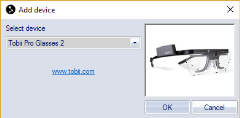
Select the Tobii Pro Glasses 2 from the list with devices and click OK.
-
Make sure that the Tobii device is enabled in the list. Then double-click on the Tobii line in the list to open the Tobii page.
-
On the Tobii page enter the following information.

Address
The IP address or name of the Tobii glasses. Press the Find Glasses button to automatically locate them on the network and update the address field.Capture rate
Select capture rate. Note that not all versions of the glasses support 100 Hz.Hardware Sync
Enable synchronized capture start between QTM and Tobii glasses. See chapter Setting up hardware synchronization for how to set up hardware synchronization.Offset
The offset of the Tobii data compared to the marker data. You can test this by capturing a subject looking at a moving marker. After that you will need to reprocess the file with different data offsets and find out where the gaze diverges a little as possible from the marker. One way to see this is to turn on the Gaze vector trace on the 3D View Settings page in Project options. Press “Default Offset” to reset the offset to default value.The latency may depend on the system configuration, for example when using Tobii glasses in combination with other input devices for QTM. Make sure to check the offset and modify it if needed if you are not using hardware synchronization.
Calibrate
Initiate Tobii calibration. Calibration is done the same way as in the Tobii Pro Glasses Controller application using the Tobii calibration card.


When the glasses are connected and set up in QTM, you can proceed to add a gaze vector, see chapter How to use gaze vectors in QTM.
Setting up hardware synchronization
If you want to make sure that the data from the Tobii Pro Glasses 2 is synchronized with the motion capture data, you can use the hardware synchronization for a simultaneous start of the recording.
The following items are required for hardware synchronization:
-
A synchronization cable included in the Tobii-Qualisys connectivity kit.
-
A Camera Sync Unit for Arqus of Miqus systems.
Set up the connections as follows:
-
Use a BNC cable to connect the Tobii sync cable to the MEAS. TIME port on the Camera Sync Unit.
-
Connect the 3.5'' connector of the Tobii sync cable to the Data synchronization port on the Tobii recorder.
For an Oqus systems with a Trigger/Sync splitter cable, set up the connections as follows:
-
Connect the Trigger/Sync splitter cable to the control port of one of the cameras.
-
Use a BNC cable to connect the Tobii sync cable to Sync out on the splitter cable.
-
Connect the 3.5 mm connector of the Tobii sync cable to the Data synchronization port on the Tobii recorder.
-
Do the following settings in QTM:
-
Open the Synchronization page under Project Options.
-
Select the Oqus camera which is used for the synchronization.
-
Set Mode under Synchronization output to Measurement time.
-
The synchronization connection is only needed at the start of the capture. After starting the capture, the synchronization cable may be disconnected.
Hardware synchronization and offset compensation is only applied to captured data. It is not possible to compensate for latency in real time.