Open topic with navigation
Step 4 – Camera Calibration
- Click on the New Page icon
 .
.
-
Enter 2D view and first physically remove all reflective objects, such as the calibration kit or similar reflective equipment, from the measurement volume.
-
Place the L-shaped calibration reference on the floor.
When using force plates, the placement depends on the convention that was used when setting up the force plates in QTM. We recommend that you take a picture of the default placement of the L-frame and put that picture in your lab. Precise alignment is critical for the calculation of the joint moments/power.
-
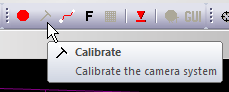
To calibrate, click on the calibration tool on the top menu bar.
- A window will open that will ask how long you would like to capture. 20-30 seconds is a sufficient amount of time for a standard full body volume. For large volumes, increase the time so that you have enough time to cover the complete volume that will be used.
- Click start and you will hear a bell. Using your calibration wand walk around the capture area and wave the wand in the area that the subject will be moving in. Note: for guidance how to move wand in the volume refer to QTM user manual in the section Making a measurement > Calibration of the camera system > Wand calibration method.
- Stop when you hear another bell.
- Confirm that the average camera residual is approximately 1-2 mm or under. Each camera should have collected at least 300 points. The standard deviation of the wand length should be 1-2 mm or better for a full body volume.
-
If you use the C-Motion Caltester, now you can perform a test to ensure the L-frame was aligned correctly and the force platform settings are correct.
Force Analysis - Camera Setup
Two Miqus Video cameras are required.
Recommended video settings:
- Video frame rate should be set to one the following settings:
- 16:9 Full HD @ 85 Hz
- 4:3 Full HD @ 100 Hz
- 1:1 FullHD @140 Hz
- 16:9 540p @ 200 Hz
- To be able to view all video frames in QTM, marker frame rate ( in Project options -> Camera) should not be smaller than video capture frame rate, even if markers are not used.
- Recommended resolution 540p or 1080p. Lower resolution gives smaller video files and increases processing speed. 720p is currently not supported.
- Cropping. To keep video size smaller, square cropping is recommended. If a wider field of view is required to have a movement in frame this is also possible.
- Both video cameras must run at the same frequency. If no marker capturing cameras are part of the system, set the marker frame to the same value as video frame rate.
Recommended camera setup:
- The recommended camera placements are shown on the images below.
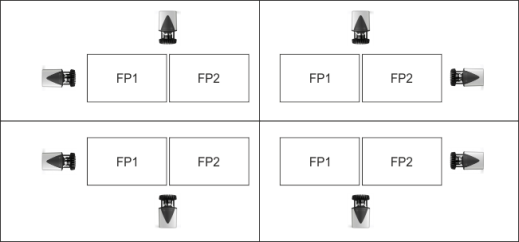
- Side: Have the bottom of force plates aligned horizontally with the bottom of the frame. This way one gets more of the person in the frame
- Front/Back: Have the force plates in the middle of the frame both horizontally and vertically. This allows the person to be in the frame also when doing Gait.
Front/back | Side |
 |  |
Set coordinate system for forces:
It is required that forces are calculated in the global coordinate system. In Project options navigate to Force Data and set Coordinate system for force/COP display and export to World(Lab).

Making sure QTM exports force data:
In a Project, go to Matlab export settings and tick Force data.
Force plate measurement frequency:
This is recommended to be at least 1000 Hz, because for high impact movements the forces can change rapidly and lower measurement frequencies might not capture those changes.
Force Analysis - Calibration
- Click on the New Page icon
 .
.
-
Click the "Intensity" button to switch the video cameras to intensity mode. Remove or cover reflective material, if possible. Otherwise use the "mask" tool to remove reflections. Alternatively, reduce the exposure time and/or increase the marker threshold but make sure the markers on the calibration wand and L-frame remain visible to the cameras (red colour in intensity mode).
-
To calibrate, click on the calibration tool on the top menu bar.
- A window will open that will ask how long you would like to capture. 20-30 seconds is a sufficient amount of time for a standard full body volume. For large volumes, increase the time so that you have enough time to cover the complete volume that will be used.
- Click start and you will hear a bell. Using your calibration wand walk around the capture area and wave the wand in the area that the subject will be moving in. Note: for guidance how to move wand in the volume refer to QTM user manual in the section Making a measurement > Calibration of the camera system > Wand calibration method.
- Stop when you hear another bell.
- Confirm that the average camera residual is approximately 1-2 mm or under. Each camera should have collected at least 300 points. The standard deviation of the wand length should be 1-2 mm or better for a full body volume.
